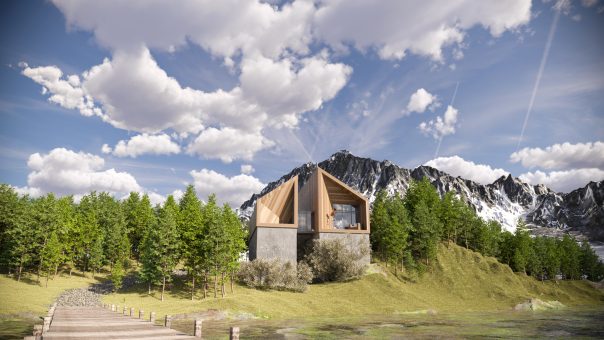
Случайное размещение объектов с помощью Corona Scatter 3ds Max. Создание травы
Наполнение сцены – очень важная часть работы. Но сделать это не всегда просто. Особенно, когда нужно расположить множество одинаковых или схожих объектов, камней, деревьев или травы. Сложность в том, что у каждого должно быть свое место, разный угол поворота, разный размер. А иногда необходимо просто раскидать по сцене кучу самых разный предметов. И поможет вам в этом Corona Scatter. Этот инструмент устанавливается вместе с программой Corona Renderer. Если у вас еще нет этой программы, то в этой статье объясняется, как ее установить. А теперь разберемся с работой самого инструмента.
1. Где найти?
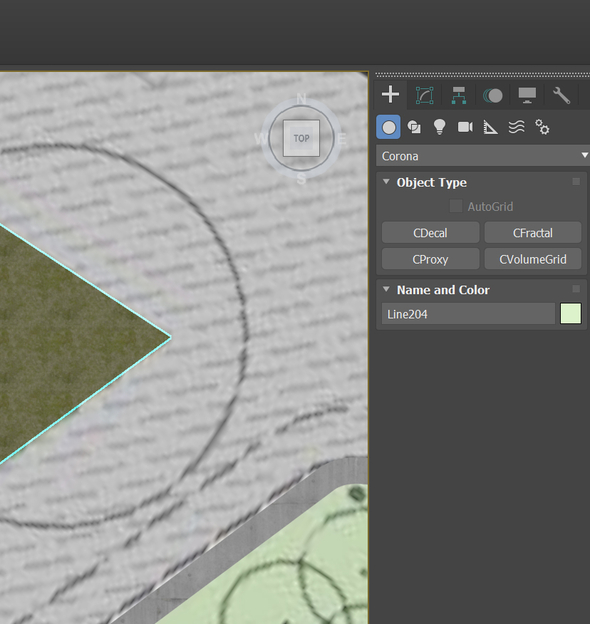
Corona Scatter находится в Create – Geometry – Corona – CScatter. Нажав на кнопку, нужно растянуть плоскость в рабочей области. Стоит заметить, что все новые плоскости нумеруются по порядку. С плоскостью Corona Scatter можно взаимодействовать как с большинством других объектов. Ее можно перемещать, поворачивать, масштабировать, даже можно накладывать модификаторы. Но это никак не скажется на работе инструмента. Ведь эта плоскость всего лишь визуальное отображение инструмента.
2. Основы работы
Для того, чтобы расположить один объект на другом, нужно перейти во вкладку Modify и выбрать плоскость Corona Scatter. Затем нажать на «+» рядом с окном Distribute on objects. После этого кликнуть на желаемые объекты, на которых будут размещаться остальные. Затем нажать на «+» рядом с окном Instanced objects. Теперь нужно выбрать мышью объекты, которые будут располагаться на указанном ранее. Как только выключится выбор объектов, предметы из второго окна окажутся на предметах из первого окна. С помощью кнопок «[…]» можно выбирать из полного списка объектов в сцене. С помощью кнопки «—» выделенные в окне объекты удаляются.
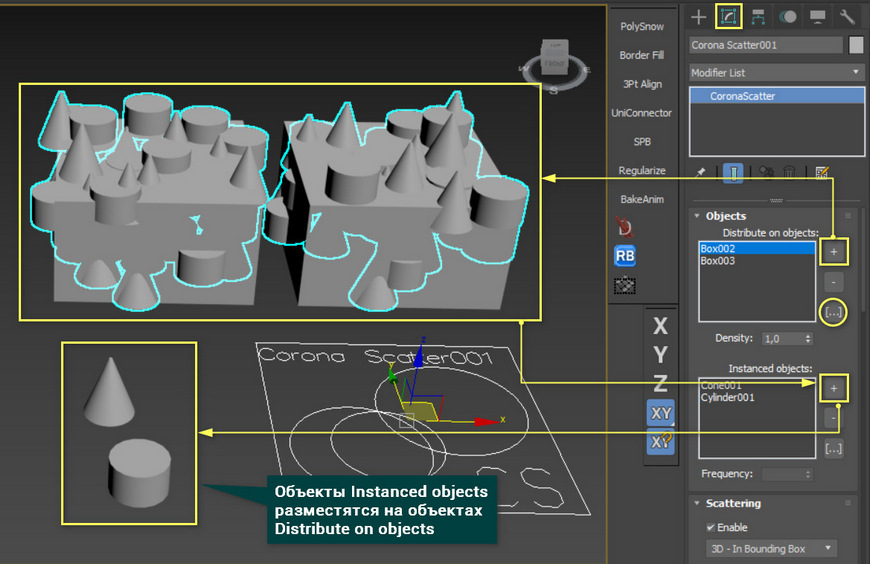
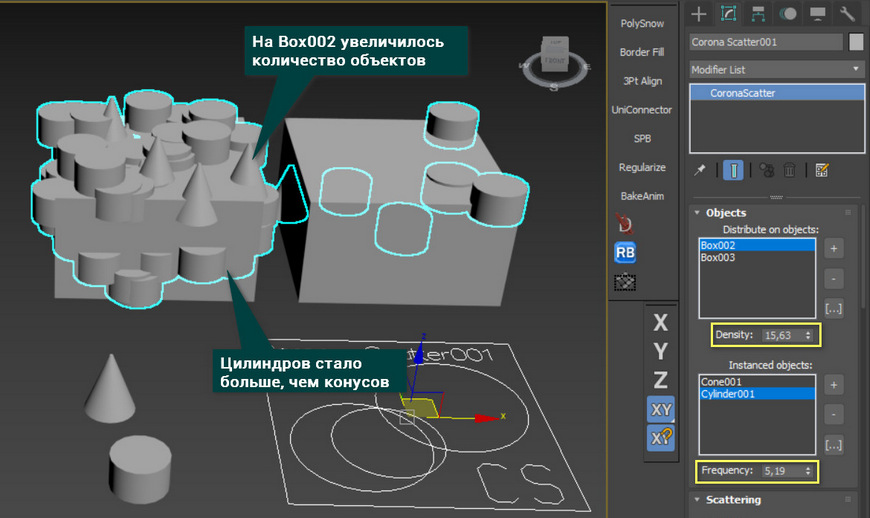
Параметр Density позволяет менять соотношение располагаемых объектов между основными. Frequency меняет соотношение располагаемых объектов между собой.
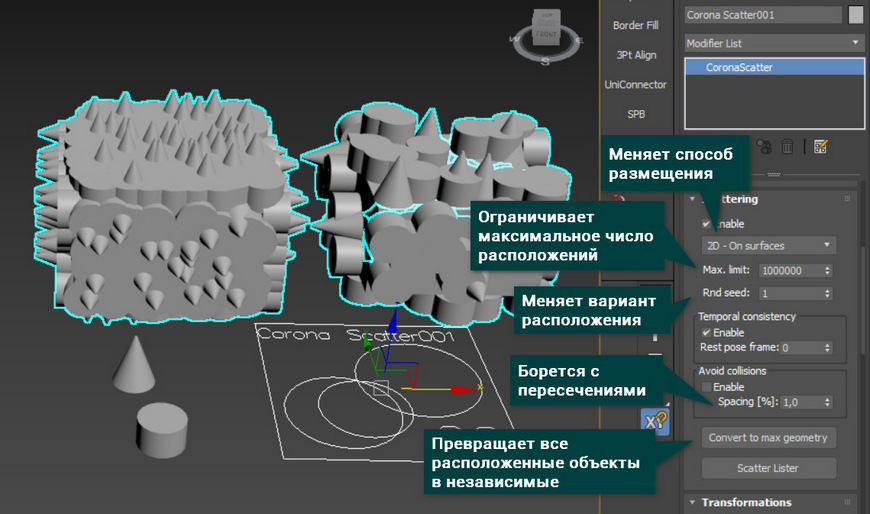
В разделе Scattering можно выбрать способ расположения объектов. Наиболее популярные — это 2D и 3D. 2D помещает объекты по их точке опоры (Pivot) на поверхность предмета. 3D размещает случайно по всему объему предмета. Max. limit ограничивает максимальное количество размещаемых объектов. Rnd seed позволяет выбрать один из множества вариантов случайного расположения. Avoid collisions позволяет отдалить размещаемые объекты друг от друга, чтобы они не пересекались.
Кнопка Convert to max geometry превращает все расположенные объекты в реальную геометрию. После этого, с каждым расположенным объектом можно взаимодействовать отдельно.
3. Случайная трансформация
Очень важным и полезным является окно Transformations. В нем имеется 3 схожих подраздела: Translation, Rotation, Scale. Каждый из них отвечает за соответствующие действия: передвижение, вращение, масштабирование. Настройки у параметров очень похожи. Изменять значения нужно рядом с буквой, обозначающей ось, по которой произойдут изменения. Затем указывается диапазон значений From – To (от — до). В нижней части раздела находится значения шага изменения и оси, по которым шаг будет производится.
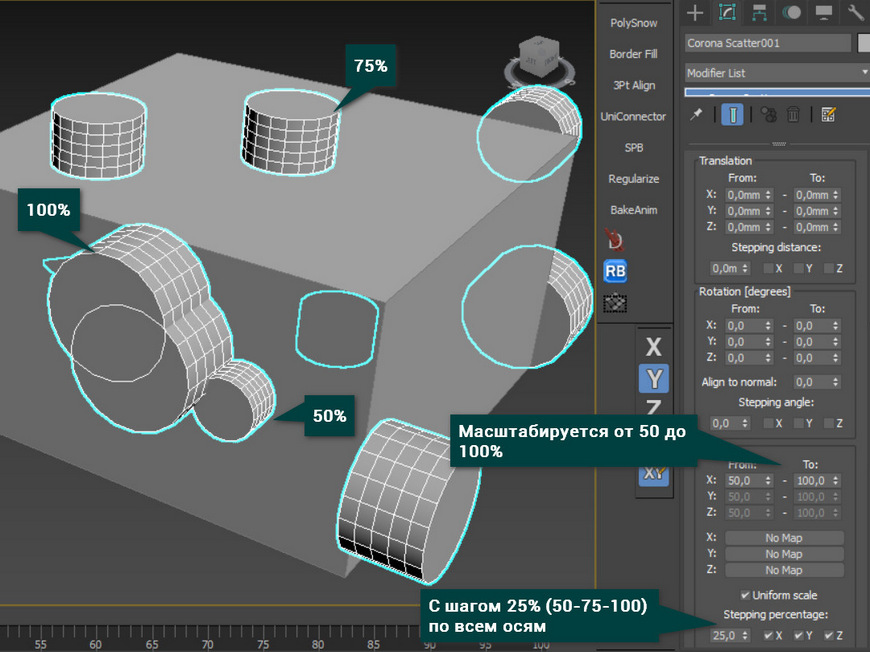
Можно выбирать одновременно несколько осей и в разных разделах. Но для того, чтобы масштабировать все оси отдельно, нужно снять галочку Uniform scale.
4. Viewport display и Surface scattering
Viewport display содержит в себе настройки отображения распределяемых объектов в рабочей области. Previz type позволяет выбрать, как отображать все созданные объекты. Displayed [%] показывает, сколько новых объектов будет отображаться в рабочей области. Но бывает так, что это значение работает не совсем корректно. Например, оно может показать чуть больше или чуть меньше объектов, чем должно. Icon size изменяет размер плоскости Corona Scatter. Это нужно исключительно для удобства взаимодействия. Параметр Points [%] работает так же, как Displayed [%], но для типа отображения Point cloud. Так же можно выбрать автоматическое обновление (Update automatically) или ручное (снять галочку и нажимать Update now).

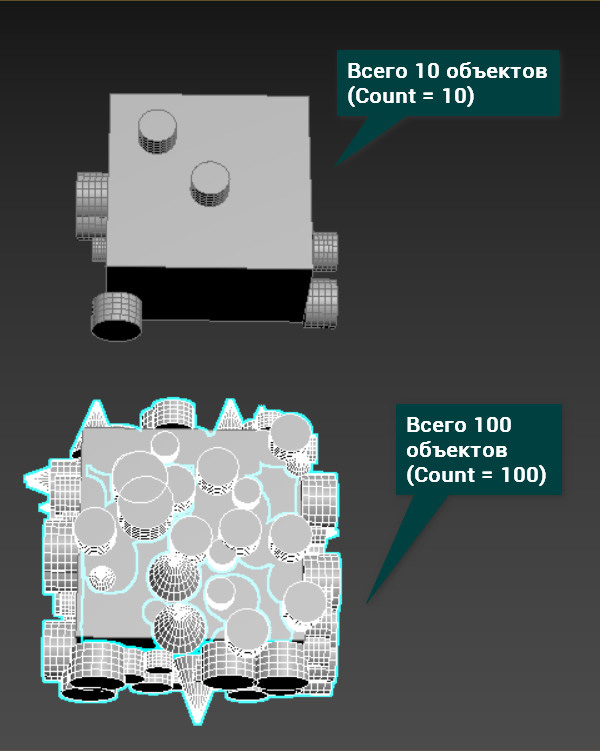
Surface scattering управляет объемом и типом располагаемых объектов. Параметр Count отвечает за реальное количество создаваемых объектов. Так же можно выбрать распределение по UV координатам, выбирать канал и настраивать. Но с такой необходимостью редко можно встретиться.
5. Создание травы
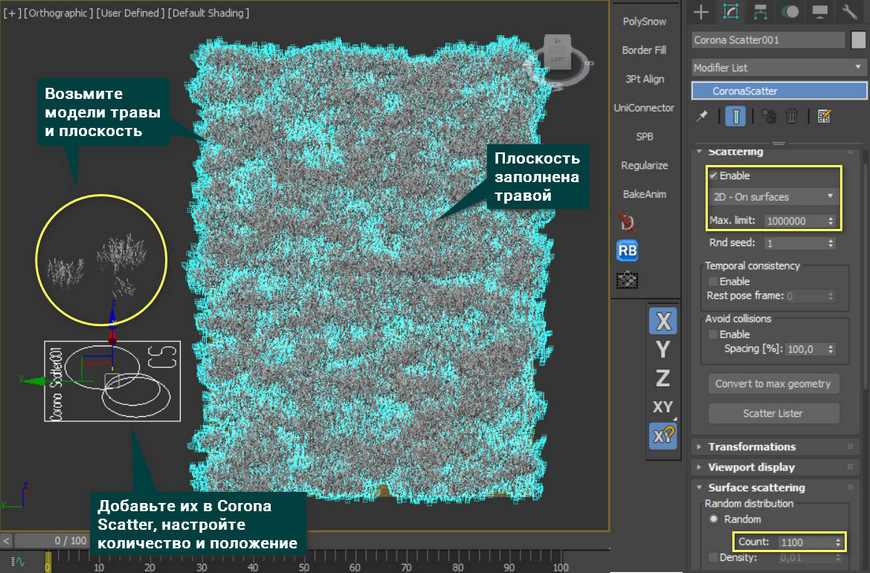
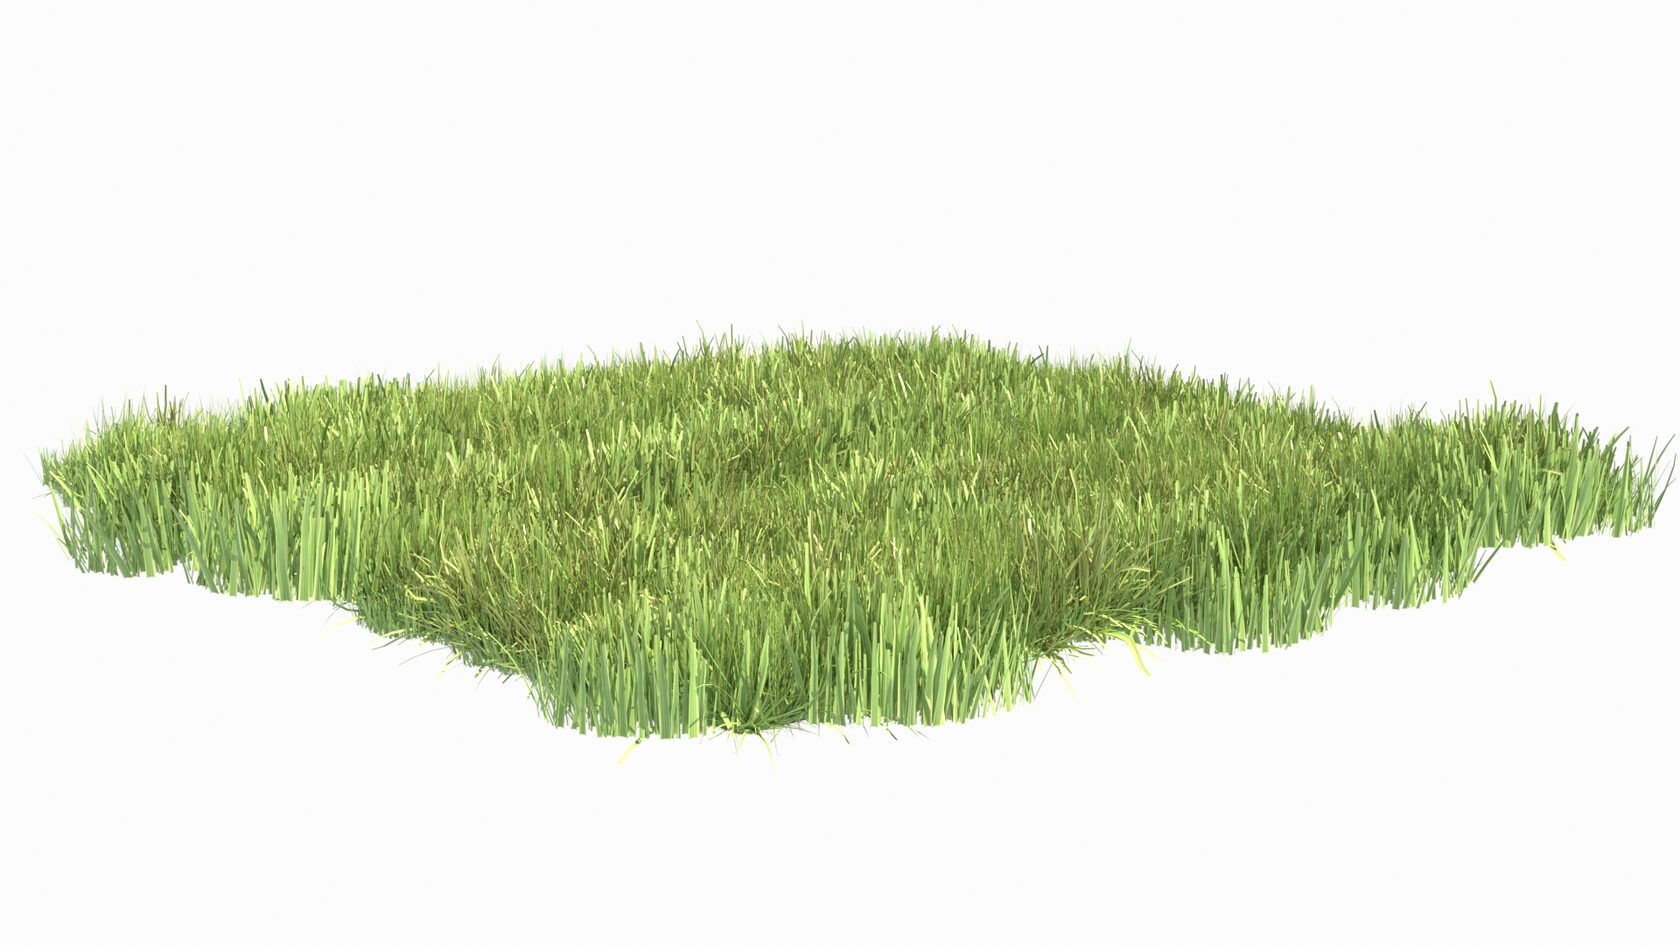
Используя все перечисленные выше инструменты, вы сможете размножать объекты по поверхности. Самый простой пример – трава.
- Добавьте модели травы и плоскость в CoronaScatter, как показано в разделе 2 этой статьи.
- Настройте поворот и размеры травы, как в разделе 3.
- Установите нужное значение Count, чтобы заполнить плоскость земли.
В итоге у вас получится поверхность, покрытая травой. В зависимости от количества повторяющихся моделей, трава будет гуще или реже.
Пускай у этого инструмента не слишком много функций, но их достаточно для выполнения большинства задач. При желании на одном объекте можно объединять несколько Corona Scatter. Это придает еще большую гибкость. Но важно понимать, что чем больше объектов будет в сцене, тем сложнее будет визуализация. Да, для рабочей области инструмент хорошо оптимизирован. Только для рендера вычисления могут оказаться слишком обширными.
Освойте профессию визуализатора
Научитесь создавать крутые рендеры, панорамы 360, виртуальные туры и анимационные ролики.
Chaos Corona 9 released!
Corona 9 is out now, a release that not only adds powerful new features to Corona itself, it also adds much more to your subscription!
NEW FEATURES VIDEO
Here’s the quick overview of just some of the biggest new features:
The live webinar for this release will take place on October 25th so reserve your space and make a note on your calendars.
Updates to the Licensing
The Corona Licensing has been updated, with one license now covering both 3ds Max and Cinema 4D, and with the Premium tier including some new Chaos tools such as Chaos Phoenix, Scans, and Player. You can view the new licensing details on the purchase page.
MAJOR FEATURES
All these features apply to Corona for 3ds Max and Cinema 4D, so we’ll only talk about them once, and demo images may be from either host software. In case you are not familiar with both 3ds Max and Cinema 4D, be aware that what 3ds Max calls “Maps”, Cinema 4D calls “Shaders” ��
We’ll start with the new features in Corona itself, then move on to the new products included in your Premium license.
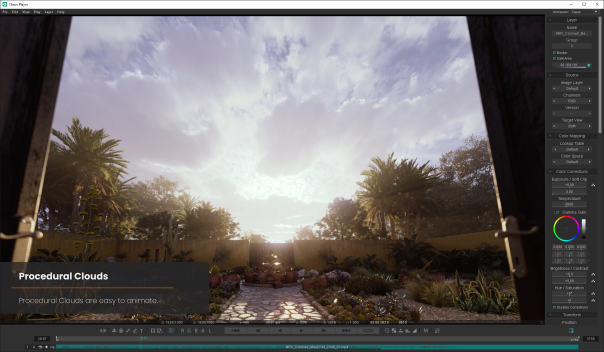
Procedural Clouds
The Corona Sky was great, but was always a clear sky. HDRIs can be great, but you’d need a unique HDRI for different levels of cloud cover or different times of day, and they were static (or if animated, needed a huge number of large files that took up a ton of space on your hard drive).
The new Procedural Clouds solve all these issues, letting you tweak the amount of cloud cover, the shape of the clouds, their position in the scene, and animate them with ease. You even get to add and animate airplane trails (contrails) across your sky!
Due to how they are calculated and rendered, they have minimal effect on render times compared to full volumetric solutions. They can even be previewed in the viewport, so you can adjust the settings without having to render or even use IR.
The Procedural Clouds respond to the position of the Sun, so you can have evening and dawn just as easily as you can have full noon. You can search for the look you like with the random Seed option, and all of the parameters can be animated so that clouds can move, cloud coverage can grow or reduce, and so on. You can also choose whether the clouds cast shadows into your scene or not.
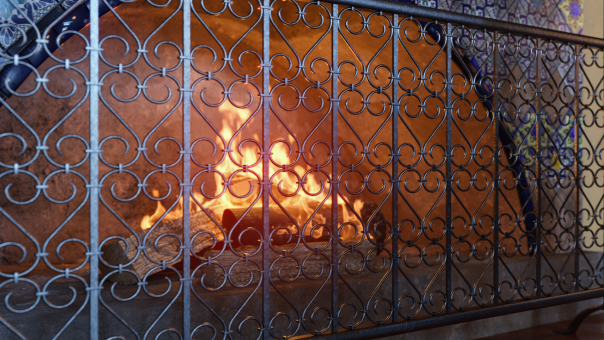
Corona Pattern
Now you can tile real geometry over a surface, with the same ease as you’d tile a texture. Not only does this give you far more realism than you’d ever obtain with opacity, bump, and displacement maps, it also requires far less memory than those alternatives.
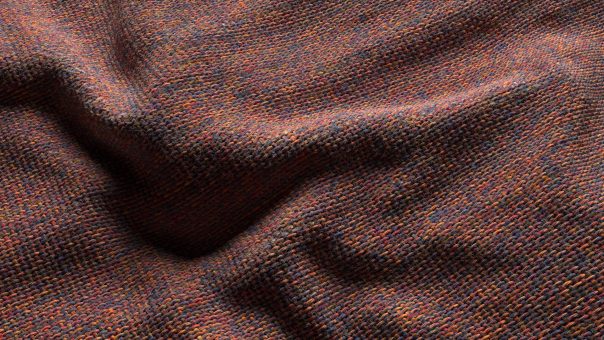
To get a quick grasp of when this is useful, think of things such as:
- Fabrics, where those are made of knitted or woven strands
- Wire fences, fireguards
- Jewelry such as chains
- And much more!
To simplify working with Corona Pattern, you can have the height of the geometry scale automatically and naturally with the tiling so that the height reduces as the geometry is scaled more frequently, or you can choose to disable this and set a manual height if required.
Of course once you get to grips with the tool, you’ll start to think of many other ways in which it can be used, raising the realism of your scenes to a whole new level. Meantime, we have a few examples of geometry that you can use with Pattern, you can download them here.
Edge Trimming
This has been the single most requested feature for Chaos Scatter. We’re happy to let you know that it is now included in this latest update to Scatter. A prime example is letting you control the edges of lawns and other grass areas, as seen below:
The effect relies on the way the geometry being scattered is set up. If you are scattering individual grass blades (unlikely, as this would be very inefficient!) then you will already have good edging. The Edge Trimming will help when you are scattering “clumps” of individual grass blades, by hiding the individual blades which would be out of bounds.
To set it up, you simply add a Scatter Edge Trimming shader (Cinema 4D) / ChaosScatterEdgeTrimming map (3ds Max) into the opacity slot of all materials being used on the objects being scattered. This methodology and result is similar to that used by other scattering tools for Corona 9, but in the future we want to simplify the process, e.g. by using a single checkbox.
Out of Core Rendering for Textures
This option reduces the amount of memory required for texture maps loaded via Corona Bitmap. Testing done in-house and by a few archviz studios have seen savings of between 5 and 70%, depending on how heavy the scene is, how big the textures in use are, and other factors.
This is disabled by default in Corona 9, and you will have to activate it to take advantage of it. This is done via a checkbox in the Performance section of the Render Settings:
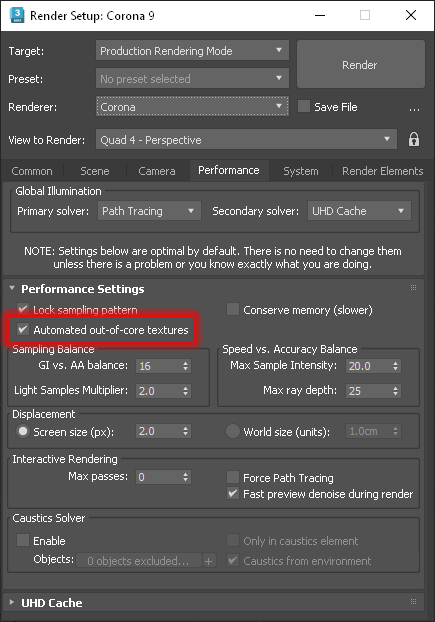
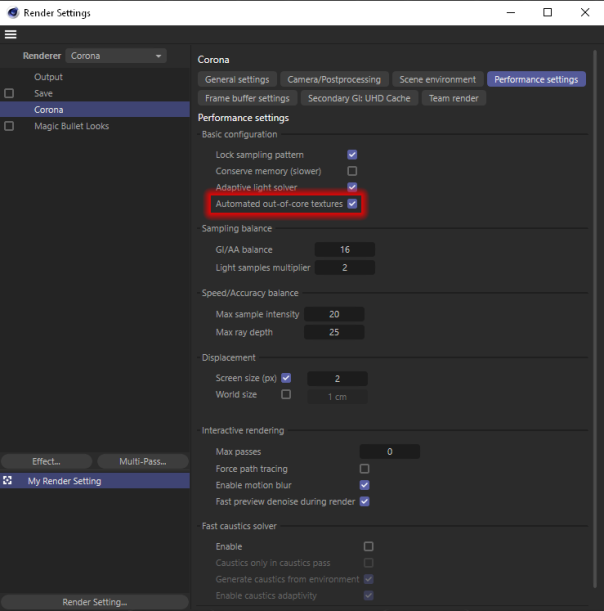
Corona will automatically allocate the space needed on the hard drives when the option is enabled. Manually overriding the settings is also possible if desired, under the System settings. When using OOC Textures, Corona will automatically clear the cache on loading a new scene or on closing the host application.
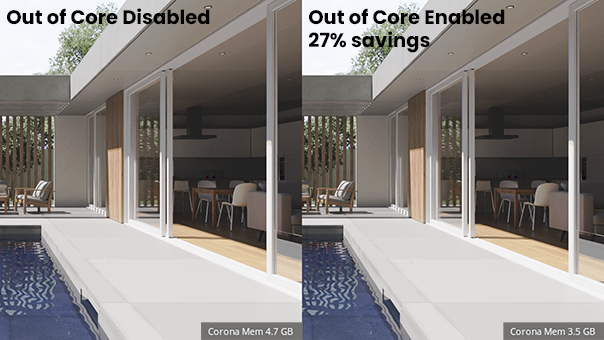
The Out of Core texture rendering makes a difference when the texture has a higher resolution than what is needed based on its placement in the scene.
Shutter Curve for Motion Blur
In the real world, a camera’s shutter will take a certain amount of time to open, and a certain amount of time to close, and there are usually some elements of acceleration and deceleration involved in both those processes.
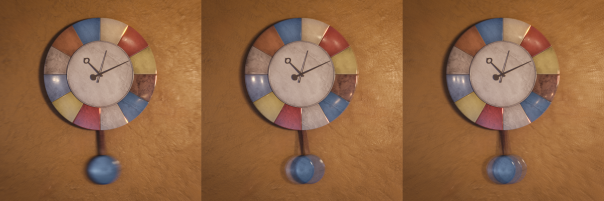
The Shutter Curve controls for Motion Blur will let you accurately represent these effects in your renders. Rather than an even, linear result, you can achieve less or more blur at the start, middle, and end of the blurred area. This is a case where “examples are worth more than words”, so you can see some examples (and download them) in the video below:
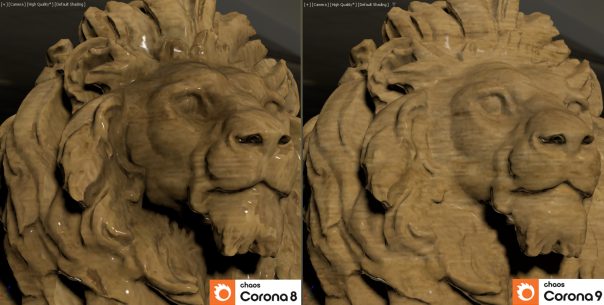
Under the Hood Improvements
While not immediately visible from the outside, we did as promised at the time of the Corona 8 release and worked on significant code clean-up and refactoring after the huge number of features added in 8. Some examples are:
- Removed over half of code related to light sampling, which will allow us to improve and maintain it faster in the future.
- Rewrote error windows into qt, which made it faster, improved the look on different platforms, removed limitations on the number of messages, and got us closer to a unified modern UI.
- Improved some under-the-hood code to fix initial designs for the Tone Mapping added in Corona 8, which also fixed some bugs.
- And more!
The following three Chaos tools are included in your Corona Premium subscription, though they are also still available to purchase separately too.
Chaos Scans
There are some materials that are impossible to recreate with any number of parameters and maps in a generalized material, as they have a unique way of responding to light. This is where Chaos Scans comes in. Each material in the library is meticulously scanned to capture how it interacts with light so that you can drag-and-drop it into your scene for 100% accuracy in both look and scale.
This comes into its own with materials such as leather, clothing fabrics, car paints, and reflective and holographic materials. With just a click you can add these materials to your scene using the CoronaScannedMtl (3ds Max)/Scanned Material (Cinema 4D), confident that you are recreating reality without spending hours trying to build the material for yourself.
Chaos Phoenix
Chaos Phoenix is a dynamics simulator that integrates seamlessly with 3ds Max and Corona (and V-Ray, of course), and lets you create realistic fire, smoke, liquids, flames, explosions, ocean waves, mist, splashes and more.
A few Corona users have already been making great use of Chaos Phoenix thanks to the compatibility between it and Corona, but until now it has been out of reach for most users since it required a separate purchase.
Now it is part of the Premium Corona subscription, you too can add a vast range of effects to your renders using the same software used by Hollywood FX studios. These example images give you just some ideas for what you can use Phoenix for!
Chaos Player
The safest and most flexible way to create your animations is to render to an image sequence (not straight to video format) – but this leaves you needing to load those into a complex, high-end video editor just to see what is happening in your animation.
Enter Chaos Player – a lightweight, straightforward way to view your image sequences, and carry out basic compositing, color grading and editing too, before exporting to a video format. You may never need to use another bloated video editor again!
SMALLER IMPROVEMENTS
These also apply to 3ds Max and Cinema 4D, unless otherwise noted.
- Depth of Field for Fisheye cameras
You can now use Depth of Field effects for a camera set to use Fisheye projection.
- Decal Presets in Chaos Cosmos
These actually arrived a few weeks ago, as Chaos Cosmos gets updated separately and does not have to wait for a new release of Corona for those additions to show up – we just wanted to call your attention to them here in case you missed it!
- ACES OT is on by default in the tone mapping stack
Due to how popular this has proved to be, it will be enabled by default in all new scenes. You may find yourself using an Exposure that is brighter by a value of 1 stop, in case you have particular values you habitually choose for exposure.
- Improved Viewport Previews for Corona Materials and Maps (3ds Max)
To make your life easier, we’ve improved the High Quality viewport preview of many materials and maps such as:
- Corona Physical Material
- Corona RaySwitch
- Corona Legacy
- Corona Skin
- Corona Hair
- Corona Bitmap
- Corona Select
- Corona RaySwitch
- Corona FrontBack
- Corona Mix
- Corona Triplanar (previously worked only with Autodesk materials)
Remember, this only applies when the 3ds Max High Quality viewport is enabled.
- Fixing the Error Window
This brings with it improved performance, fixes to text clipping, fixes UI problems on macOS (Cinema 4D), and more, thanks to a complete rewrite of the system.
- Spline rendering now supported (Cinema 4D)
By adding a Corona Spline Render tag to any spline, it can now be rendered in Corona.
- Corona Converter improvements (3ds Max)
– Improved metals detection and conversion.
– Improved conversion of refractive materials (materials with black refraction color are no longer treated as refractive materials).
- Support for distribution maps in Chaos Scatter (Cinema 4D)
You can now add a bitmap or procedural noise to a Scatter to control the distribution of the scattered objects. An exaggerated example is shown below for illustration:
- Added support for the VRaySwitchMaterial (3ds Max)
Previously, there was only partial support for this, which has now been improved.
- Speed improvements when rendering multiple material previews
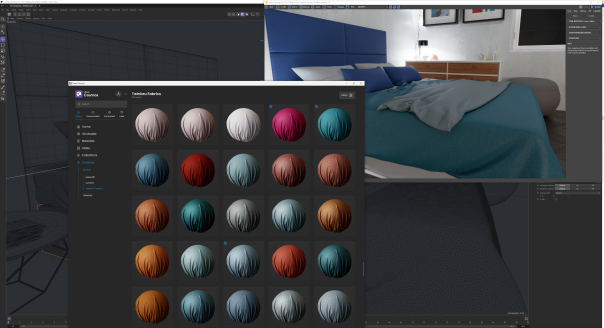
- Twinbru fabrics are now available in Chaos Cosmos
BUG FIXES, SHARED
These bug fixes apply to both 3ds Max and Cinema 4D
Crash and NaN fixes
- Fixed crash when resetting all curves in Tone Mapping.
- Added crash handler to the Corona Image Editor.
- Fixed Corona Image Editor crashing on opening some CXR files.
Other Fixes
- Improved the import of materials from Chaos Cosmos, they should now render similarly to materials imported into V-Ray.
- Fixed Corona using only the E-cores of modern Intel CPUs on Windows 11 when in the background.
- Corona installer updated to use license server 6.0.0.
BUG FIXES, 3DS MAX
Crash and NaN Fixes
- Fixed crash when translating an object and starting IR with a hotkey.
- Fixed issue where having a black environment and non-black environment overrides could lead to NaNs.
- Fixed NaNs appearing when per-material background override is set to a constant black color.
- Fixed Tone Curve editor crashes when moving any points.
- Fixed crash when rendering overridden operators when rendering from a 3ds Max physical camera.
- Fixed Tone Mapping crash when changing Camera Tone Mapping values in Auto Keying mode.
- Fixed crash with Corona modifiers and some combinations of animated modifiers.
- Fixed crash occurring when opening and closing Render Settings in Max 2023.2.
- Fixed rare crash occurring while rendering with IR and a material is assigned.
- Fixed crash after resetting a scene, creating a Corona camera, and adding an operator to the Tone Mapping.
- Fixed crash when undoing animation in a newly added Tone Mapping operator.
- Fixed crash when the Memory Report is used, and improved the Memory Report formatting.
- Fixed crash when importing Cosmos model “Shutters 03 47-17”.
Tone Mapping Fixes
- Fixed entering values to the spinbox in Tone Mapping and the Color Picker when “,” is set as the delimiter.
- Fixed position of the title “TONE MAPPING” on HiDPI monitors.
- Fixed tooltips in Tone Mapping.
- Tonemapping operators created through MAXScript now have correct defaults, and should be enabled by default.
- Fixed incorrect enabled state of tone mapping operator widgets when rendering from a 3ds Max Physical Camera.
Other Fixes
- Disabling CoronaCameraMod via the eye icon in the modifier stack now correctly disables its tone mapping effect on the rendered image.
- Fixed multiple Cosmos browsers popping up when launching Chaos Cosmos.
- When sampling colors in the Curve Editor, the color selected is now the one before the curves were applied.
- The curves coming from the legacy color mapping configuration are now validated and the default curve is used if the loaded curve is invalid.
- Fixed the Y-axis being reversed when sampling colors in the Curve Editor (that is, picking the value from the top of the viewport actually picked it from the bottom).
- Fixed incorrect anisotropy of 3ds Max’s Physical Material in 3ds Max 2023.
- Fixed HDRI Environment being rotated by 90 degrees in the Viewport Preview when Corona Color Correct or Corona Tonemap Control nodes are used.
- Obsolete Corona object parameters are now hidden from track views.
- Fixed multiple spawning licensing dialogs when trying to start a docked IR without an active license.
- Small optimizations to 3ds Max scene parsing.
- Fixed Corona Camera Mod and Corona Camera UI layout.
- Fixed naming of batch-loaded MultiMap textures to begin at either 0 or 1 to match Color slots.
- Fixed 3dsmaxbatch.exe unexpectedly engaging 1 Corona GUI license.
- Fixed rendering starts in the 3ds Max VFB after logging in to the License server and not restarting 3ds Max.
- Added warnings for Hair, Displacement, and Pattern modifiers when multiple modifiers are applied to a single node, advising that all but one modifier will be ignored.
- VolumeGrid assets can be updated in the Max asset tracker.
- Fixed “device or resource busy” error in some scenes.
- Fixed displacement artifacts when rendering at high resolutions.
- Fixed Tone mapping being empty in Camera > Edit Tone Mapping after settings were reset unless some changes were made in the VFB.
- Fixed being unable to enter decimal values into spin boxes when starting with the . (dot) symbol and the input language was not English.
- Fixed CoronaImageCmd paths with spaces which did not work in Corona 7 and 8 (but did in Corona 4).
- Fixed issue with CProxy display method while auto-key is active.
- Fixed Multiloaders do not work with the Sky model, Corona Material Library, and Optix.
- Fixed checking the Tone Mapping override checkbox while IR was running not restarting IR.
- Fixed “Internal error: device or resource busy” when VFB is hidden.
- Displacement – error when generating an extreme number of vertices now leads to a helpdesk link.
BUG FIXES, CINEMA 4D
Crash and NaN Fixes
- Fixed crash when using Cosmos on macOS when both Corona and V-Ray are installed.
- Fixed crash when using search in the Cosmos browser on macOS (this problem was resolved on the server-side, so the problem should also be resolved for version 8).
- Fixed crash when loading a corrupted Proxy file with Full Mesh Preview enabled.
- Fixed occasional crashes when changing the visibility of an instanced object in IR.
- Fixed occasional crashes when running Cinema 4D with low memory and a low memory error was triggered.
- Fixed crash in Decals caused by some objects with corrupted geometry.
- Fixed crash when the Ground Color for the Sky was set to colors above 1 (which was possible in Cinema 4D 2023).
- Fixed crash when a VDB file fails to load in a Corona VolumeGrid object on macOS.
- Fixed crash when reordering the tonemapping pipeline via the Edit dialog while having focus in one of the spin edits.
Corona Light Fixes
- Corona Lights can now be instanced using both render instances and multi-instances (previously this only worked in IR).
- Corona Lights now also work with Chaos Scatter.
- Corona Lights now support included/excluded objects in the viewport preview.
- Viewport performance improved when there are lots of Corona Lights present.
- Fixed issue where a spherical Corona Light would disappear when it was scaled non-uniformly in IR.
- Corona Light now works with modifiers.
Other Fixes
- Fixed problem with Avoid Collisions in Chaos Scatter not working with Decals.
- Fixed errors reported in the command line version of Cinema 4D when loading Corona.
- Fixed the import of some Cosmos materials in macOS.
- Fixed issues when using ColorPicker in the Corona VFB with linear percent value types.
- Fixed issues which reported as a “Non-Standard Format error” when loading different types of LUTs.
- Fixed problem with missing close button in the About dialog in S22 on macOS.
- Cosmos materials are now imported with the correct scale when using Triplanar mapping.
- Fixed problems with importing Cosmos objects when the path to the assets download directory contains localized characters.
- Fixed rendering of the Cinema 4D Area Light (note that there is still only basic support for native Cinema 4D lights).
- Fixed problem where a hidden object would render in IR when it was instanced by render instance or multi-instance.
- Fixed minor memory leak (a few KB) when rendering.
- Fixed some cases where the Layered material preview was not updated after changing its sub-materials.
- Fixed minimum value for Step in the UVW Randomizer.
- Fixed some issues with the Tone Mapping pipeline being reset when switching cameras.
- Fixed Corona Sky preview in new versions of Cinema 4D.
- Minor UI fixes in the tonemapping Edit dialog (tooltips, double click, etc.)
- Fixed rendering of colors of instances scattered using Chaos Scatter when no material is attached (previously, such instances rendered black).
- Fixed flipped cylindrical camera.
WHAT’S AHEAD?
With this change to what a Corona subscription means, we’ll be looking to build on that in the future, including the addition of Chaos Cloud Rendering, plus looking into other features we’ve been looking forward to delivering to you. Please check our 3ds Max and Cinema 4D roadmaps to see what we have planned!
At this early stage, nothing from the above is set in stone as due in Corona 10, and neither is this everything we are considering. You might also want to check in on the Chaos Scatter roadmap too.
DOWNLOAD CORONA 9
No need to scroll back up, here’s the download link again!
(Remember, register for the live webinar!)
Thanks!
We hope you are as excited as we are as Corona continues to evolve. Little did we think even a couple of years ago that tools as powerful as Phoenix and Scans would have become part of the standard Corona license, and this is just the next step in Corona’s continuing evolution.
None of this would be possible without you, our users, and your valued feedback on what you need in a render engine to make it the world’s leading CPU engine and we look forward to continuing this journey together. To all of you….
Thank you!
Tom and the whole Corona Crew
Corona 9
У меня так на нескольких компах в одной сети, не понимаю почему, бьёмся. Нет решения пока. Но где-то заработало сразу.
C:\Program Files\Corona\Corona Renderer for 3ds Max\Standalone c этой папки содержимое скопируй в корень макса C:\Program Files\Autodesk\3ds Max 20XX
C:\Program Files\Corona\Corona Renderer for 3ds Max\DR Server c этой папки содержимое скопируй в C:\Program Files\Autodesk\3ds Max 20XX\plugins
На сайте c 22.09.2015
Сообщений: 65
Ukraine
Цитата Bestviz:
Цитата Roman_Zh:
Ну там кроме корректной установки на 2024 макс и больше других правок нет.
И Scatter старый)
Можно из последнего народного вирея взять скатер последний.
Version:2 (Hotfix 6), build timestamp: Apr 4 2023 в 9.2 короне 2. хф 4
На сайте c 17.11.2021
Сообщений: 10

Привет всем! подскажите пожалуйста, куда пропал скаттер? (корона 9, 23 макс)
На сайте c 27.03.2015
Сообщений: 484
Вологда
Цитата 192:
Привет всем! подскажите пожалуйста, куда пропал скаттер? (корона 9, 23 макс)
в раскрывающемся списке на вашем скрине вместо «Corona» смените на «Chaos Scatter»
На сайте c 17.11.2021
Сообщений: 10
Цитата ksonto:
Цитата 192:
Привет всем! подскажите пожалуйста, куда пропал скаттер? (корона 9, 23 макс)
в раскрывающемся списке на вашем скрине вместо «Corona» смените на «Chaos Scatter»
в списке нет скаттера
На сайте c 27.03.2015
Сообщений: 484
Вологда
Цитата 192:
в списке нет скаттера
в приличном обществе об этом не говорят, но я бы проверял лечение, так как он отдельно лечится
На сайте c 21.08.2013
Сообщений: 3134
Не резиновая
Цитата ksonto:
Цитата 192:
в списке нет скаттера
в приличном обществе об этом не говорят, но я бы проверял лечение, так как он отдельно лечится
А точно корона 9? Даже не леченый скаттер должен отображаться в списке и панелька для него отдельная должна появиться после установки.
На сайте c 27.03.2015
Сообщений: 484
Вологда
Цитата Bestviz:
А точно корона 9? Даже не леченый скаттер должен отображаться в списке и панелька для него отдельная должна появиться после установки.
да, тоже такая мысль возникла, но тогда старый бы скаттер на своем месте был
На сайте c 17.11.2021
Сообщений: 10
Цитата Bestviz:
Цитата ksonto:
Цитата 192:
в списке нет скаттера
в приличном обществе об этом не говорят, но я бы проверял лечение, так как он отдельно лечится
А точно корона 9? Даже не леченый скаттер должен отображаться в списке и панелька для него отдельная должна появиться после установки.
На сайте c 27.03.2015
Сообщений: 484
Вологда
Цитата 192:
точно 9 корона
если в листенере напечатать «ChaosScatter» и энтер нажать, синяя надпись появляется?

На сайте c 02.02.2014
Сообщений: 74
Цитата 192:
Привет всем! подскажите пожалуйста, куда пропал скаттер? (корона 9, 23 макс)
Гайс, если потеряли скаттер, проделываем следующие манипуляции:There is a solution, manually install the scatterer. To do this, after installation, run the installer again. And in the window, select «Unpack files» and select a location (any location, you can delete it later). Further in the unpacked folder you can find missing files and folders. Just copy them to the appropriate places:1. C:\Program Files\Chaos Group\Scatter\3ds Max 20232. C:\Program Files\Autodesk\3ds Max 2023\Plugins3. C:\Program Files\Autodesk\3ds Max 2023\UI_lnAfter Replace the file ScatterCore.ForScatter_Release (C:\Program Files\Chaos Group\Scatter\3ds Max 2023) with the one in the patch (понятно, что последнее касается народной версии).
На сайте c 17.11.2021
Сообщений: 10
Цитата Gansalez:
Цитата 192:
Привет всем! подскажите пожалуйста, куда пропал скаттер? (корона 9, 23 макс)
Гайс, если потеряли скаттер, проделываем следующие манипуляции:There is a solution, manually install the scatterer. To do this, after installation, run the installer again. And in the window, select «Unpack files» and select a location (any location, you can delete it later). Further in the unpacked folder you can find missing files and folders. Just copy them to the appropriate places:1. C:\Program Files\Chaos Group\Scatter\3ds Max 20232. C:\Program Files\Autodesk\3ds Max 2023\Plugins3. C:\Program Files\Autodesk\3ds Max 2023\UI_lnAfter Replace the file ScatterCore.ForScatter_Release (C:\Program Files\Chaos Group\Scatter\3ds Max 2023) with the one in the patch (понятно, что последнее касается народной версии).
в папке chaos group у меня нет скатера, походу надо корону переустанавливать)
Инструмент Corona Scatter в 3ds Max
Каждый рабочий день может стать началом в изучении чего–то нового, что прежде вы никогда не пробовали или боялись попробовать. В таких случаях на помощь могут прийти плагины, скрипты и инструменты, которые упрощают работу в разы. Одним из таких инструментов является Corona Scatter.
Автор: Тигран Ларсон
Содержание
Corona Scatter – незаменимый инструмент в создании растительности, ворса, шерсти, волос и прочего террейна, включающего в себя обилие плотно расположенных друг к другу 3D–объектов.
Потенциал Corona Scatter очень велик и найти ему применение можно в разных областях 3D–моделирования. Чаще всего данный инструмент используют в экстерьерных сценах для создания травы и прочей растительности в видимой камерой области. Его особенность и одновременно преимущество в том, что можно добиться реалистичного и естественного расположения растительности по поверхности, не совершая при этом большое количество действий вручную.
Но не стоит пренебрегать данным инструментом в других сферах, по аналогии с растительностью его можно использовать в еще больших по масштабу проектах, например, при градостроительстве. Это вам не цветочки сажать 😀
Давайте я подробно покажу все параметры данного инструмента, чтобы вы понимали весь спектр его возможностей, которых можно добиться с его помощью. Обещаю, результат вас не оставит равнодушным и вы больше не сможете игнорировать использование Corona Scatter 😉
Где скачать Corona Scatter для 3ds Max
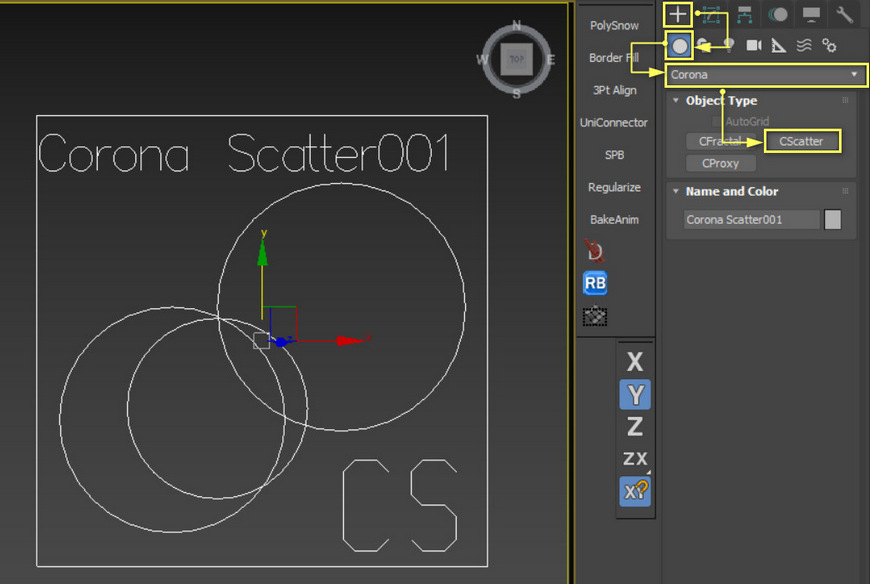
Для начала давайте разберемся где вообще достать данный инструмент и как его установить. На самом деле, для того, чтобы воспользоваться Corona Scatter – скачивать ничего не придется. Если у вас установлена одна из версий Corona Render, то обозреваемый нами инструмент уже входит в комплект с программным обеспечением и вам достаточно его только найти на панели инструментов:
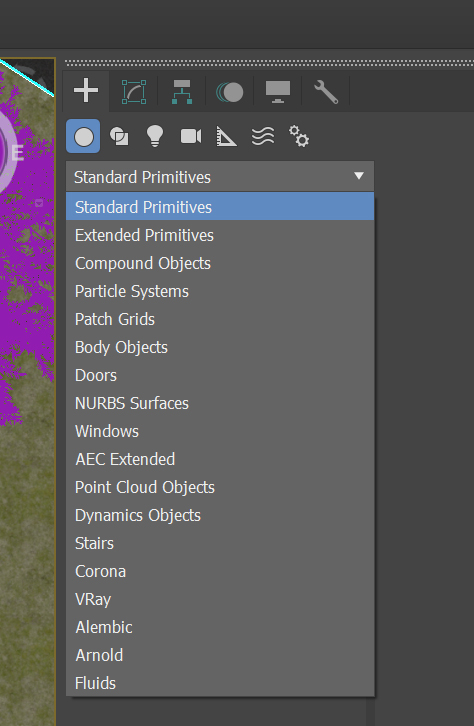
- Находим на панели с инструментами раздел Create.
- Далее кликаем на иконку подраздела Geometry.
- В подразделе Geometry кликаем по списку Standard Primitives и находим пункт Corona.
Настройки и параметры Corona Scatter
Перед тем как приступить к практической части, изучим все настройки и параметры Corona Scatter. Так у вас будет общее представление о возможностях инструмента, чтобы без проблем понимать о чем идет речь в практической части.
Чтобы попасть в раздел настроек Corona Scatter понять как им пользоваться вам нужно выбрать ранее созданную плоскость, как на GIF–изображении выше, а затем кликаем на вкладку Modify. Там отобразится перечень с обилием настроек и параметров, рассмотрим их по порядку:
Objects

В данном разделе вы можете выбирать нужные вам объекты для рассеивания их по выбранной вами поверхности и дальнейших манипуляций с ними. Назовем их объектами для скаттеринга.
Distribute-on objects – данное окошко позволяет выбирать нужные вам плоскости или объекты, на которых будут располагаться другие выбранные вами объекты.
+ (знак плюса) – нажатие кнопки позволяет выбрать нужные вам объекты из сцены во вьюпорте.
– (знак минуса) – нажатие кнопки позволяет исключить нужные вам объекты из сцены во вьюпорте.
[. ] – нажатие кнопки открывает отдельное меню со всеми объектами в вашем проекте, позволяя выбрать нужные вам объекты из сцены или исключить некоторые из них.
Instanced objects – данное окошко позволяет выбирать нужные вам объекты для их дальнейшего расположения на плоскостях или объектах, выбранных ранее в окошке Distribute–on objects.
+ (знак плюса) – нажатие кнопки позволяет выбрать нужные вам объекты из сцены во вьюпорте.
– (знак минуса) – нажатие кнопки позволяет исключить нужные вам объекты из сцены во вьюпорте.
[. ] – нажатие кнопки открывает отдельное меню со всеми объектами в вашем проекте, позволяя выбрать нужные вам объекты из сцены или исключить некоторые из них.
Scattering

Enable – наличие галочки активирует один из видов отображения объектов, нужных вам для эффекта рассеивания по площади поверхности. Данный пункт имеет 3 типа отображения:
- 1D On splines – активирует отображение объектов для скаттеринга только вдоль сплайнов. Данный режим может пригодиться вам в создании различных туннелей, труб, декоративных изгородей, заборов и пр.
- 2D On surfaces – активирует отображение объектов для скаттеринга по имеющимся, выбранными вами геометрическим поверхностям. Данный режим чаще всего используется в создании различного террейна и ландшафта.
- 3D In bounding box – активирует отображение объектов для скаттеринга в пределах границ объемного объекта, например коробки. Данный режим может пригодиться в наполнении внутренних частей тех или иных объектов, например, жвачка в аппаратах с жевательной резинкой, пузырьки в аквариумах или детский аттракцион – бассейн с шариками.
Rod seed – изменение этого параметра позволяет расположить объекты по поверхности случайным образом. Можете регулировать данный параметр так, как считаете нужным.
Temporal consistency

Enable – наличие галочки активирует функционал, ответственный за нужное вам отображение объектов на поверхностях при работе с анимацией. Если ваш проект связан только со статическими кадрами для рендеринга, то можете снять галочку с этого пункта. За манипуляции отвечает следующий параметр:
Rest pose frame – этот параметр позволяет отрегулировать нужный вам кадр, с которого будут происходить изменения при активации Temporal consistency.
Avoid collisions

Enable – наличие галочки активирует функционал, ответственный за пересечение объектов на выбранной вами поверхности друг с другом. За манипуляции отвечает следующий параметр:
Spacing [%] – этот параметр позволяет отрегулировать расстояние между объектами во избежания пересечения коллизии друг с другом (в процентах). Очень удобный параметр, если, допустим, вам нужно отрендерить определенные группы зданий на фоне, но так, чтобы ни одно из них не пересекались друг с другом. Оставив значение по умолчанию – 100%, ни один объект на плоскости не пересечется с другим. Но если это какой–нибудь лес, то реалистичнее будет, когда кроны деревьев будут пересекаться с такими же деревьями как и в реальной жизни. Для этого можете задать среднее значение для подобных объектов в 60–70%. В любом случае, пробуйте изменять данный параметр так, чтобы он лучшим образом повлиял на правильность выполнения и внешний вид именно вашего проекта.
Далее имеется 2 кнопки, на них тоже стоит обратить внимание, так как случайное нажатие одной из них может привести к поломке и зависанию вашей сцены:
Convert to max geometry – нажатие кнопки сконвертирует все имеющиеся объекты скаттеринга в 3D–геометрию. Проще говоря, если рассматривать это на примере с деревьями, то каждое дерево, размноженное и посеянное на определенной поверхности с помощью Corona Scatter, превратится в отдельный объект, а именно будет иметь свою собственную геометрию. Это чревато зависаниями, вылетами и поломками вашей сцены. Не нажимайте данную кнопку, если объекты рассеивания исчисляются не одним десятком!
Scatter lister – нажатие кнопки открывает отдельное меню с информацией по каждому созданному объекту Corona Scatter. Там вы можете производить различные манипуляции, частично похожими на перечень настроек из вкладки Modify, только тут каждый объект Corona Scatter у вас под рукой.