Translation of «An error occurred» in Polish
[An error occurred while deleting this selection.] => Wystąpił błąd podczas usuwania zaznaczonych obiektów.
An error occurred while trying to save the file.
Wystąpił błąd podczas próby zapisania pliku.
An error occurred with our activation server or licensing service.
Wystąpił błąd serwera aktywacji lub usługi licencjonowania.
2147287015 (80030019) An error occurred during a seek operation.
2147287015 (80030019) Wystąpił błąd podczas operacji wyszukiwania.
An error occurred and this feature is no longer functioning properly.
Wystąpił błąd i funkcja ta nie działa poprawnie.
An error occurred while processing your request, please try again.
Wystąpił błąd podczas obsługi zlecenia, proszę spróbuj jeszcze raz.
An error occurred if the reply was received late, after timeout.
Wystąpił błąd jeżeli poprzednia odpowiedź dotarła późno po timeoucie.
An error occurred and your inquiry could not be sent.
Wystąpił błąd i twoje zapytanie nie mogło być wysłane.
An error occurred while obtaining the dedicated administrator connection (DAC) port.
Wystąpił błąd podczas uzyskiwania portu dedykowanego połączenia administracyjnego (DAC).
An error occurred preventing us from sharing your wish list.
Wystąpił błąd uniemożliwiający udostępnienie Twojej listy życzeń.
An error occurred while running the transaction. More information is available in the detailed report.
Wystąpił błąd podczas uruchamiania transakcji. Więcej informacji znajduje się w szczegółowym raporcie.
An error occurred while scanning your keyring
Podczas skanowania twojego zbioru kluczy wystąpił błąd
An error occurred while retrieving the list of available backends:
Wystąpił błąd podczas pobierania listy dostępnych systemów:
An error occurred while attempting to process this problem report:
Wystąpił błąd podczas próby zgłoszenia błędu:
Your message has been sent An error occurred, try again later
Twoja wiadomość została wysłana Wystąpił błąd, spróbuj ponownie później.
An error occurred while copying image, check your memory limit.
Wystąpił błąd podczas kopiowania grafiki, plik już nie istnieje.
An error occurred while creating your theme.
Wystąpił błąd podczas tworzenia Twojego motywu.
Possibly inappropriate content
Examples are used only to help you translate the word or expression searched in various contexts. They are not selected or validated by us and can contain inappropriate terms or ideas. Please report examples to be edited or not to be displayed. Rude or colloquial translations are usually marked in red or orange.
Register to see more examples It’s simple and it’s free
No results found for this meaning.
Suggest an example
Display more examples Suggest an example
Advertising
New: Reverso for Windows
Translate text from any application or website in just one click .
Download for free
Voice and photo translation, offline features, synonyms, conjugation, learning games
Results: 146 . Exact: 146 . Elapsed time: 104 ms.
Helping millions of people and large organizations communicate more efficiently and precisely in all languages.
If an error occurred while updating or installing macOS
The message might say that an error occurred while downloading, preparing, or installing, or that the installer is damaged or could not be verified. The cause of messages like these can vary, and sometimes they are only temporary. If the message recommends a solution, such as to redownload the installer and try again, please try that first. If the message says that your Mac doesn’t have enough storage space, learn how to free up storage space. The other solutions here are organized starting with the easiest.
Check your internet connection
Even if you’re not installing macOS from the internet, the installer needs the internet to get firmware and other information specific to your Mac. Make sure that your Mac has a working and stable internet connection.
Install in safe mode
Install while your Mac is started up in safe mode. To start up in safe mode, determine whether you’re using a Mac with Apple silicon, then follow the appropriate steps:
Apple silicon
- Shut down your Mac.
- Turn on your Mac and continue to press and hold the power button until you see the startup options window.
- Select your startup disk, then press and hold the Shift key while clicking “Continue in Safe Mode.”
- Log in to your Mac. You might be asked to log in again.
Intel processor
- Turn on or restart your Mac, then immediately press and hold the Shift key as your Mac starts up.
- Release the key when you see the login window, then log in to your Mac.
- You might be asked to log in again. On either the first or second login window, you should see ”Safe Boot” in the upper-right corner of the window.
Install after repairing your disk
Use Disk Utility to repair your startup disk. Then try updating or installing macOS again.
Install from macOS Recovery
Install while your Mac is started up from macOS Recovery. This gives you the latest version of the macOS currently or most recently installed. To start up from macOS Recovery, follow the appropriate steps:
Apple silicon
Turn on your Mac and continue to press and hold the power button until you see the startup options window. Click the gear icon labeled Options, then click Continue.
Intel processor
Turn on your Mac and immediately press and hold Command (⌘)-R until you see an Apple logo or other image.
If you’re asked to select a user you know the password for, select the user, click Next, then enter their administrator password. When you see the utilities window in macOS Recovery, select Reinstall macOS, then click Continue and follow the onscreen instructions. Learn more about using macOS Recovery to reinstall.
Install after erasing your Mac
If no other solutions work, erase your Mac, then reinstall macOS or restore from a backup.
- How to erase a Mac with Apple silicon
- How to erase an Intel-based Mac
If the issue persists or you need help, please contact Apple Support.
8 Useful Fixes for an Error Occurred While Troubleshooting!
Sometimes something on your computer isn’t working, and you will ask the built-in Windows Troubleshooters for help. Troubleshooters can find and fix many common problems for you, but the issue «an error occurred while troubleshooting» may occur unexpectedly. MiniTool will offer 8 useful solutions to fix this troubleshooting issue in this post.
An Error Occurred While Troubleshooting Windows 10/8/7
Computer troubleshooting can be a tricky thing. But in Windows 10/8/7, there are built-in Troubleshooters that can help you to resolve most of the common Windows problems automatically in a few clicks.
For example, if you can’t add a new piece of hardware, or there are problems like unexpected keyboard behavior, program compatibility issues, search and indexing problems, Windows update issues, etc., Windows Troubleshooters can be helpful.
However, the Troubleshooters are not always working well. Sometimes, when you try to fix computer issues, the error “An error occurred while troubleshooting” will appear on your computer screen in Windows 10/8/7, followed by an additional message.
The additional message may be:
- A problem is preventing the troubleshooter from starting.
- An unexpected error has occurred. The troubleshooting wizard can’t continue.
Usually, there is a random error code in the interface of “An error occurred”, like 0x80070057, 0x8000FFF, 0x80070005, 0x80070490, 0x80070002, 0x8e5e0247, 0x803c0103, etc.
It is annoying when Windows Troubleshooters doesn’t work, especially if you are solving a problem that has been bugging you for a while. How to fix troubleshooting? Follow the solutions below to find out how to fix it.
How to Fix Troubleshoot Problems in Windows 10/8/7
Solution 1: Perform a System Restore
When troubleshooting error happens on your Windows 7/8/10 screen, if you have created a system restore point beforehand, you can solve this issue by using System Restore feature to revert your computer to a previous restore point to undo system changes.
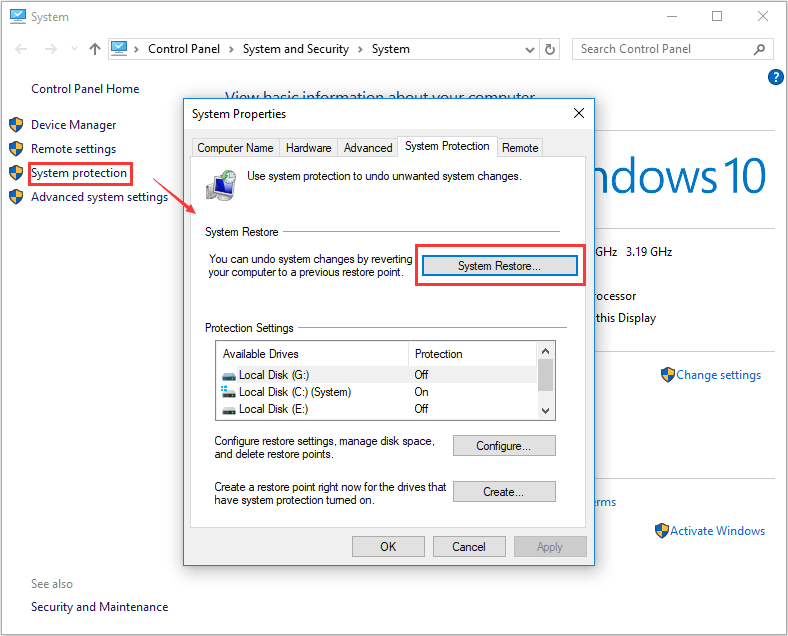
Step 1: Right-click on This PC or Computer and click Properties.
Step 2: In the pop-up window, click System protection to enter the System Properties tab. Then, click the System Restore button to start a system restore.
Step 3: After entering the System Restore window, click the Next button to continue.

Step 4: The created system points will be listed, just choose the desired restore point and click the Next button.
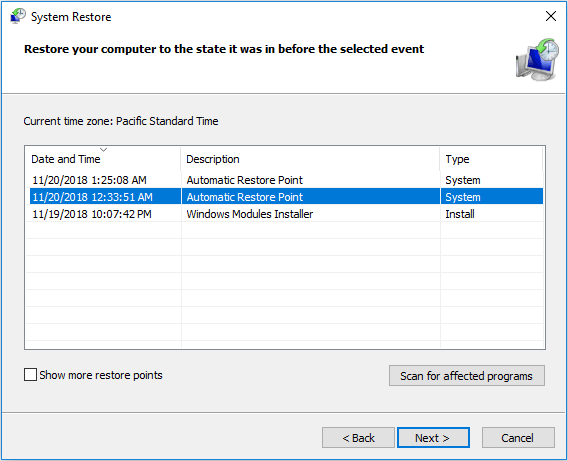
Step 5: Confirm your restore point and complete the restoration process by following the instructions on the screen.
After finishing the restoration, check whether troubleshooting error still persists.
Tip: In addition to a system restore point, you can also use the system image created by Windows built-in Backup and Restore utility or the third-party Windows backup software – MiniTool ShadowMaker, to restore the PC from the system image to solve the “an error occurred while troubleshooting” issue.
If you don’t have a system restore point or system image file, what should you do to fix Windows troubleshooters not working issue? Try other solutions below.
Solution 2: Start Cryptographic Services Using Service Manager
This is the most common solution and could fix the troubleshooting problem immediately. If the Cryptographic Services process is not running in the background, the “an error occurred while troubleshooting” issue will happen in Windows 10/8/7. Thus, you need to enable the service.
Follow these steps to enable Cryptographic Services:
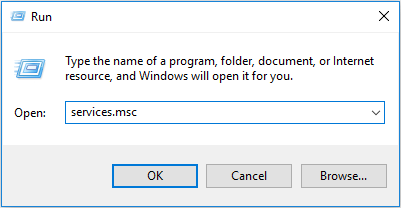
Step 1: Press Windows and R keys on your keyboard at the same time to call out the Run dialog. Then, input services.msc in the text box and click the OK button or Enter key.
Step 2: After running the Services window, scroll down the list to find Cryptographic Services, double-click it and set the Startup type to Automatic under the General tab. If Cryptographic Services is not running, you can click the Start button to run it immediately.
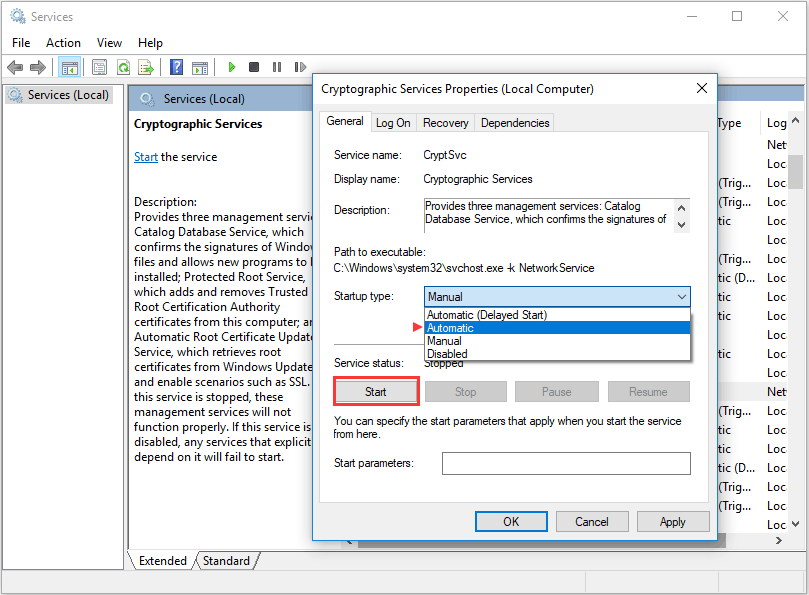
Step 3: Finally, click Apply and OK to make all changes effective.
Next, you can run the troubleshooter to see whether the error still appears on your computer screen in Windows 10/8/7.
Solution 3: Temporarily Disable User Account Control Temporary
If “an error occurred while troubleshooting” happens, you can try turning User Account Control off. Just follow the steps below:
Step 1: Type UAC in the search box and click Change User Account Control settings from the search results.
Step 2: Drag the slider all the way down to Never notify. Finally, click the OK button to apply the change.
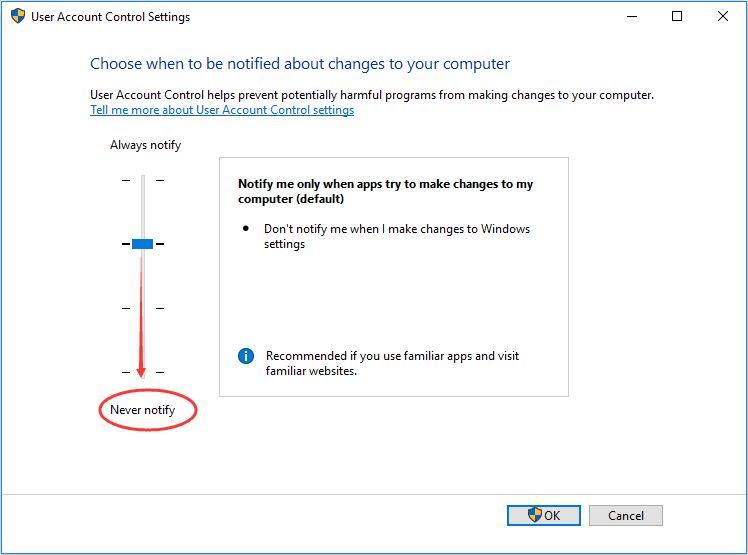
This way, the Windows Troubleshooters not working issue may be solved. If it won’t work, continue to try other ways.
Solution 4: Disable Antivirus Program and Firewall
Sometimes the security software or firewall is the cause that keeps Windows Troubleshooters from searching for solutions on the Internet or sending the required information to Microsoft servers. To get rid of “an error occurred while troubleshooting”, you can try to temporarily disable your antivirus program or firewall and see if the troubleshooter works well.
Under some circumstances, you may have to completely uninstall the security software and switch to a different antivirus program.
Solution 5: Run System File Checker
You know, System File Checker (SFC) is a utility in Windows 10/8/7 which could be used to scan for and restore corruptions in Windows system files. Some users claim that it is helpful for fixing their issues by running an SFC scan.
Sometimes if the Windows files become corrupted, a certain Windows troubleshooter may stop working with the message – “an error occurred while troubleshooting”. Here, you can follow the instructions to fix this troubleshooting error.
Step 1: Run Command Prompt as administrator.
Step 2: In the CMD window, input sfc /scannow command and hit the Enter key.
Step 3: Then the SFC scan starts. Keep in mind that the verification may take some time, thus, please wait patiently until the system scan completes.

After finishing the scan, you can exit the CMD interface. Then, you can use the troubleshooter on the Troubleshooting page and see if the troubleshooting error still exists. If you experience the issue again or SFC is not working, you can try using DISM scan instead.
To do this, see the following steps:
Step 1: Still, open Command Prompt as administrator.
Step 2: Type the command: DISM /Online /Cleanup-Image /RestoreHealth and press Enter to run it.
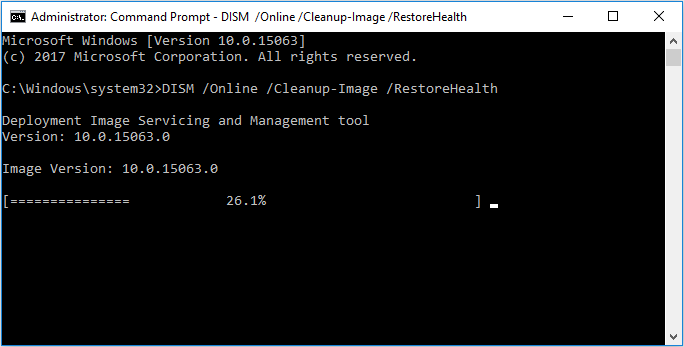
Now, the DISM scan starts. This operation will also take some time, so please wait until it finishes.
Solution 6: Repair .NET Framework
Reportedly, sometimes the corrupted .NET Framework may give rise to the issue – an error occurred while troubleshooting 0x8007005/0x8000FFF/ 0x80070057/, etc..
To get out of trouble, you need to repair your .NET Framework installation. This method is fairly simple and you can do it by following the guide:
Step 1: In Windows 7, right-click on the Start button to go to Control Panel and enter the Programs and Features section. In Windows 10, go to Settings > Apps > Apps & features.
Step 2: Find .NET Framework from the list of installed programs and click on Uninstall/Change or Change.
Step 3: Choose the Repair option. Then, follow the wizards to fix your .NET Framework.
Once you complete the repair, troubleshooting might stop having errors.
Solution 7: Create a .bat File and Run It as Administrator
If the message “An error occurred while troubleshooting. The troubleshooting wizard cannot continue” appears in Windows 10/8/7, you can try this method.
Step 1: Just create a notepad file or text document on your computer.
Step 2: Open the document, and type the following lines:
net stop wuauserv
ren SoftwareDistribution SoftwareDistribution.old
net start wuauserv
net stop cryptsvc
ren catroot2 catroot2.old
net start cryptsvc
regsvr32 Initpki.dll /s
echo Restarting Computer
shutdown.exe -r -t 00
Step 3: Save the file as a .bat file, for example, repair.bat.
Step 4: Right-click on this file and choose Run as Administrator.
After the operation finishes, restart your computer and check whether the Windows Troubleshooters not working issue still persists. Usually, this method is quite helpful to fix troubleshooting.
Solution 8: Modify Registry Editor
In some forums and videos, some users have provided one way to get rid of the troubleshooting error, which is to change Windows Registry.
Tip: Before you do, it should be best to back up registry keys to avoid system accidents.
To do this, see the following guide:
Step 1: Press the Windows logo and R key on the keyboard at the same time to open the Run dialog.
Step 2: Enter regedit and press Enter key.
Step 3: Go to the path:
HKEY_LOCAL_MACHINE\SOFTWARE\Policies\Microsoft\Windows\ScriptedDiagnostics.
Step 4: Right-click on the ScriptedDiagnostics key and choose the Delete option.
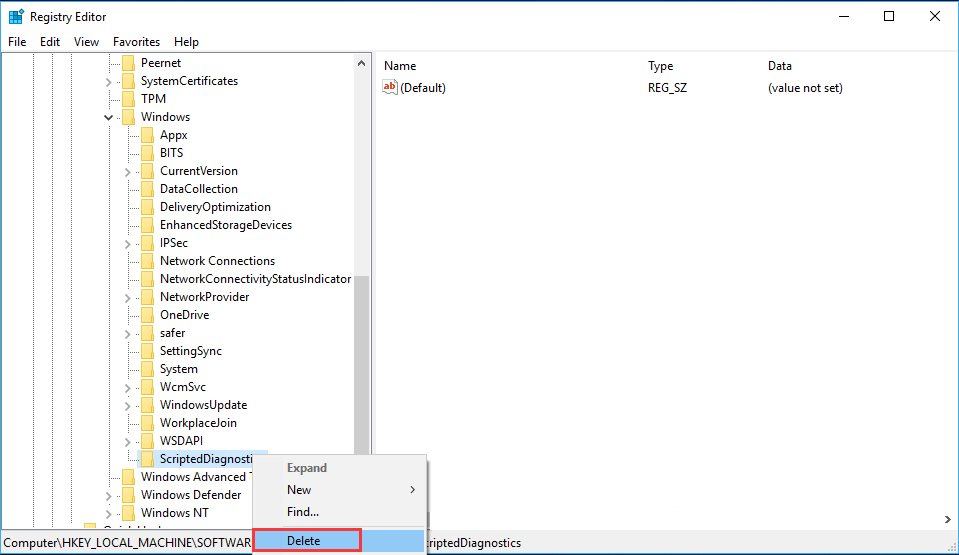
Step 5: Go to another path:
LOCAL_MACHINE\SOFTWARE\Policies\Microsoft\Windows\ScriptedDiagnosticsProvider
Step 5: Right-click on the registry key ScriptedDiagnosticsProvider and delete it.
Step 6: Exit the Registry Editor and restart your computer.
In conclusion, most of the solutions are introduced here, If you are looking for the ways to fix troubleshoot problems with the error code 0x8007005, 0x8000FFF, 0x80070057, 0x80070002, and more, these above methods are helpful. Just try them one by one to fix the troubleshooting error.
Back up Your PC after Fixing Troubleshoot Problems
Now, the issue – “an error occurred while troubleshooting”, should have been fixed.
To avoid experiencing the same issue or other computer problems and perform a quick recovery, we strongly recommend you to back up your computer system or important data so you are able to quickly and effectively restore the system or retrieve lost data in the event of system accidents or data loss.
For computer backup, MiniTool ShadowMaker, the free and professional backup software for Windows 10/8/7, will be your good choice. It easily backs up your crucial files/folders, Windows operating system, partition or the entire disk.
Above all, it can let you automatically back up your files or system by letting you set the time point with the Schedule feature. Moreover, incremental and differential backup are supported, protecting your PC safe well.
Now, download MiniTool ShadowMaker Trial Edition on your PC after finishing fixing the troubleshooting error.
Let’s see how to use this freeware to back up your system or files.
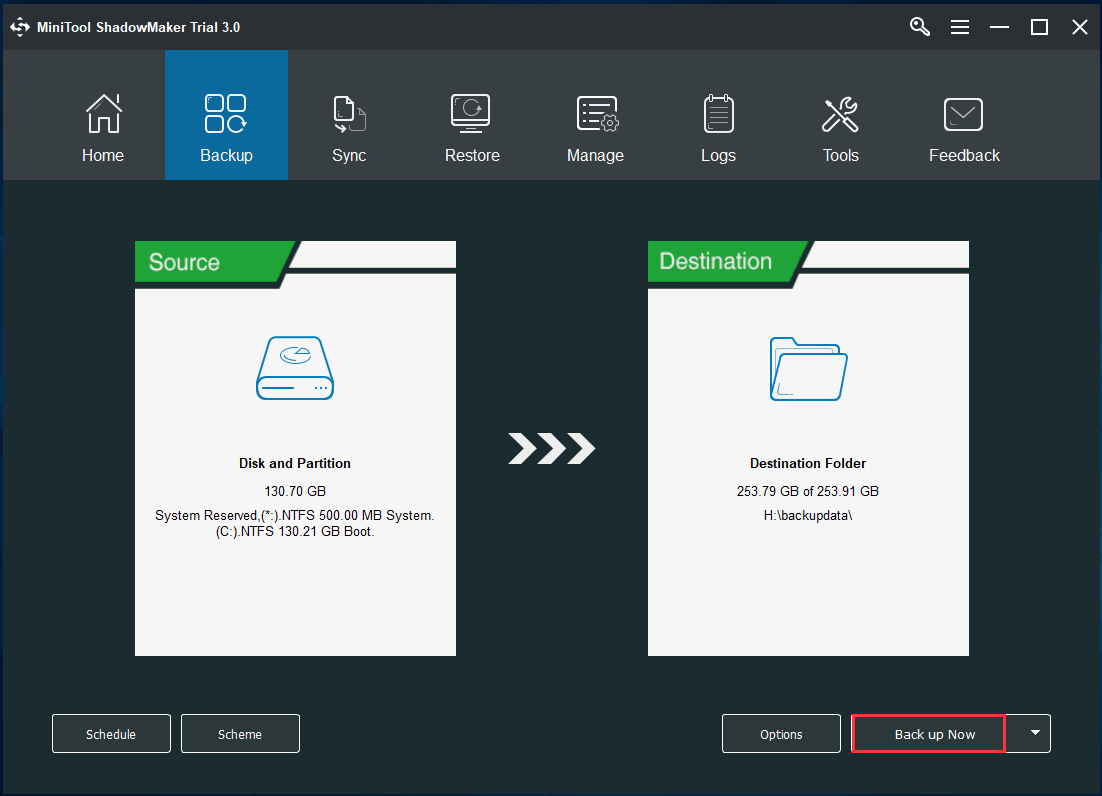
Step 1: Run this tool in Windows 10/8/7, click Keep Trial and choose the Connect in the Local section.
Step 2: In the Backup page, you will find this backup software backs up the Windows system by default. And the destination folder may be chosen if you have more than 1 disk. Just click the Back up Now button to run the task immediately in the Manage page.
Tip:
1. If you want to back up files, you can click the Source section, go to Files and Folders to choose the files that you want to back up.
2. MiniTool ShadowMaker allows you to back up your PC to an external hard drive, USB drive, NAS, etc. Just choose one based on your needs.
Once you finish the system backup, you can restore the PC to a normal state when the troubleshoot problems or other system accidents happen. Now, don’t hesitate to use it to protect your PC.
Bottom Line
When using one of the Windows Troubleshooters to fix some issues, the troubleshooter may be not working with the message “an error occurred while troubleshooting” followed by a random code like 0x8007005, 0x8000FFF, 0x80070057, 0x80070002, etc. in Windows 10/8/7.
If you are plagued by this error, just try the above 8 solutions one by one. To back up your PC and restore it to a previous state quickly and effectively, just try MiniTool ShadowMaker to create a backup image of the system or important files.
On the other hand, if you have any suggestion to fix troubleshoot problems or any question associated with MiniTool software, please contact us via leaving a comment or sending an email to [email protected] .
About The Author
Vera is an editor of the MiniTool Team since 2016 who has more than 7 years’ writing experiences in the field of technical articles. Her articles mainly focus on disk & partition management, PC data recovery, video conversion, as well as PC backup & restore, helping users to solve some errors and issues when using their computers. In her spare times, she likes shopping, playing games and reading some articles.
MSB3482
This error occurs when MSBuild encounters an error while trying to sign an output file when running the SignFile task.
The message resembles the following, but this text is followed by additional information from the signing tool:
MSB3482: An error occurred while signing: Check that the sign file exists.
Make sure the signing tool is installed; it’s installed with Visual Studio. Look to the additional information provided by the signing tool to see more about what happened.
If the thumbprint is invalid, it will trigger a cryptographic error, and you might see this error. Check the string value given as the CertificateThumbprint parameter to the SignFile task. The certificate thumbprint is the SHA-1 hash of the certificate. For more information, see Obtain the SHA-1 hash of a trusted root CA certificate. If you copy and paste the thumbprint from the certificate details, make sure you do not include the extra (3F) invisible character, which may prevent SignFile from finding the certificate.
Test certificates expire after a period of time. You might have to create a new one. See How to: Sign application and deployment manifests or for newer .NET projects in Visual Studio 2019 or later, see Deploy a .NET Windows Desktop application using ClickOnce.
When running in a non-interactive environment, such as a script in a pipeline, you can create a certificate by using the command-line tool certutil.
certutil –f –p [certificate_password] –importpfx