Fluids
Господа, целый день бьюсь с водичкой в максе. Как увеличить выходящий поток из эмиттера? Например, чтобы с имитировать воду из шланга под напором?
И есть ли толковый гайд по нему русскоязычный?
Терен Тамабрахама
Мастер
Рейтинг 200
а тут не смотрели?
Александр Шибков
Пользователь сайта
а тут не смотрели?
Смотрел, но этого вопроса там не касаются.
Вроде разобрался методом тыка, если кому поможет: в параметрах эмиттера нужно регулировать Exp Rate.
И ещё: насколько я понимаю, строенный Fluids не самый популярный метод симуляции жидкости, какие плагины чаще используют, по которым достаточно уроков не подскажете?
zadolbal nekuryu
Знаток
Рейтинг 23
если кому поможет: в параметрах эмиттера нужно регулировать Exp Rate.
а где это? я не нашёл.
Александр Шибков
Пользователь сайта
а где это? я не нашёл.
zadolbal nekuryu
Знаток
Рейтинг 23
а как изменить направление струи, а то она у меня течёт только вниз. пришлось сцену повернуть
Вложения
115,9 КБ Просмотров: 187
Александр Шибков
Пользователь сайта
а как изменить направление струи, а то она у меня течёт только вниз. пришлось сцену повернуть
Сцену поворачивать не нужно, можно изменить направление гравитации, но в твоём примере, как я понимаю, нужно эмиттер поместить внутрь другого объекта.
zadolbal nekuryu
Знаток
Рейтинг 23
нужно эмиттер поместить внутрь другого объекта.
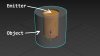
зачем внутрь? просто наполнить какую то ёмкость снаружи
Александр Шибков
Пользователь сайта
зачем внутрь? просто наполнить какую то ёмкость снаружи
Ну или так. Я не очень правильно выразился, наверное. Да и вообще я понятия не имею как правильно, только лишь говорю какой вариант нашёл для себя.
Вот это я имел ввиду:
Вложения
176 КБ Просмотров: 205
Терен Тамабрахама
Мастер
Рейтинг 200
в общем нужно член реальный сделать ![]()
![]()
mikinik
Знаток
Рейтинг 36
а как изменить направление струи,
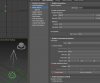
внизу у эмитера галку поставить на энейбл адишенал велосити, дальше нажать криейт хелпер, во вьюпорте хэлпер этот появится вв иде стрелки её направлени=направление потока, ну и мультиплаер поставить если надо напор увеличить.
Вложения
89,3 КБ Просмотров: 218
114,3 КБ Просмотров: 219
Александр Шибков
Пользователь сайта
внизу у эмитера галку поставить на энейбл адишенал велосити, дальше нажать криейт хелпер, во вьюпорте хэлпер этот появится вв иде стрелки её направлени=направление потока, ну и мультиплаер поставить если надо напор увеличить.
Огромное спасибо, это как раз то, что я и искал )
zadolbal nekuryu
Знаток
Рейтинг 23
в общем нужно член реальный сделать ![]()
![]()

но эта струя скорее всего из другого места
zadolbal nekuryu
Знаток
Рейтинг 23
внизу у эмитера галку поставить на энейбл адишенал велосити, дальше нажать криейт хелпер, во вьюпорте хэлпер этот появится вв иде стрелки её направлени=направление потока, ну и мультиплаер поставить если надо напор увеличить.
и после этого надо всё по новой начинать? и все caching удалять? а как прицелиться,что бы точно попасть в цель? а в процессе расчёта можно корректировать направление струи?![]() . да, по новой пошла считать. наверное надо мишень подставлять под струю?
. да, по новой пошла считать. наверное надо мишень подставлять под струю? . у меня в арнольде не рендыреца. он воду вообще не видит
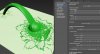
Fluids поломался: вместо симуляции частицы «бегают» по сфере.
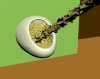
Есть модель (котлета с мяском и пустОтой для сыра) и анимация (развигание половинок). Внутрь пустОты ставлю сферу Fluids, указываю колижены и киллы. Если сразу запускаю симуляцию, то всё прекрасно: водичка заполняет пустоту и активненько выливается во время анимации.
Но вот только внутри котлетки должен быть сыр. Ставлю пресет шоколада и. по сфере-источнику просто начинают «бегать» маленькие частицы. Ничего не генерируется.
Introduction to 3ds Max Fluids – Тренинги «3ds Max»
Из курса: 3ds Max: Tips, Tricks and Techniques
- Транскрипт курса
- Файлы упражнений
- Просмотр в режиме офлайн
Introduction to 3ds Max Fluids
introduced 3ds Max Fluids, which is an implementation of the Bifrost dynamic simulation engine. Let’s get acquainted with Fluids using this motion graphic style effect of a text object made of clear liquid. This is the first version of Fluids and it’s likely that the workflow onto a background object. And behind that background object is another plane, which is going to be used as a kill plane to remove particles. We need to create the liquid object first. Go into the Create panel, Geometry, and from the pull-down list choose Fluids, click on the button labeled MaxLiquid, and then click to create that in the Top viewport. I’ll create it off to the side here. Click and drag and release the mouse, then right-click to exit creation mode. With that object still selected go to the Modify panel, and we have the ability here to choose different Icons for the Emitter of the fluid. We can assign an object as the Emitter. Let’s do that. From Icon Type choose Custom, and now we have a section that says Add Emitters. Click on the Pick button, and then select the text object in any viewport. And it’s listed here, TextPlus. Click the Pick button to turn it back off again. And now we can go into the Simulation View, which is a window dedicated to managing the liquid simulation parameters. Click Setup, Simulation View. And here we see that there is an area at the top with the name of the object, Liquid001. Below that is a Solver, and this is where we can create a cache on disk. The way this works is that you calculate the simulation and it stores the results on disk and then to play it back or render it the cached disk files are read back into 3ds Max. Let’s go into the Liquid Attributes tab in the Simulation View. We can see that our Icon Type is Custom and our Text object is listed. We also want the liquid to collide with the background, so under Colliders/Kill Planes, Add Colliders click the Pick button and select the background object, and then click again to turn Pick off. Scroll down a little bit. We can add this second plane as a Kill Plane, so that when particles fall off the edge of the first plane they simply disappear when they cross this Kill Plane. So click the Pick button under Add Kill Planes, and then select the killplane, and turn the Pick button back off again. So those are the three objects that are going to participate in the simulation. We don’t need the Text object geometry anymore, so we can select that and hide it. Right-click and choose Hide Selection. And we can reselect the Liquid object if we want, but we don’t need to, because the Simulation View will still work even if the object is not selected. Let’s move to the Solver Parameters tab. And here’s where we can determine the most basic parameters, such as the size of the world and the accuracy of time samples. We don’t need to change very much here. We’re going to leave all of the general parameters here at their defaults. Most importantly, we have the scale of the world and also the size of a Voxel. A Voxel is a volume element, just like a pixel is a picture element. A Voxel is the smallest cube in the lattice of this volumetric simulation. We will leave that at its default, which is 0.5 centimeters. And this value is hard coded in centimeters cubed. Then we have Gravity, which is also hard coded to meters per seconds squared. My scene is built at Unity scale, in other words, my text object was less than one meter on one side. Scroll down into the Simulation Parameters. We do need to change this in order to improve the accuracy of collisions. If your fluid is going through the collider objects then that means these Transport Steps or possibly Time Steps need to be increased. Time Steps can be left alone in this case, And that’s all we need to do there. The rest of it is taken care of for us. Moving onto Emitter Objects. We do want to change this as well. The Emit Type is defaulted to Emitter, which is a continuous stream of liquid. I only want the Text object to act as a container, so choose Container from the list. And we can check in on the Collision Object section as well. And it doesn’t need to be changed, but if you use different types of objects you might need to change the Mode or some of the other parameters here. But that looks pretty good as well. Then we can move to Caching. This is how we can determine the naming convention for cache files. Then we have the Display Settings tab. And we have the Size of a point. Let’s bring that down a bit to 0.2. And we’ve set up all of our parameters. We can now create our cache. Go up here to the top area and just press the play button. And the solve begins, we can see it says fluid sim 0%. And we get to see the particles on the current frame. We can also open up under Options there’s an Output Window. And this just tells us what’s going on. We’re on frame six right now. So, in fact, if we scrub in the timeline we can actually see the fluid at that point in time. But it doesn’t automatically update to the next frame in this version. We can also press play and it will continue to loop, but that might put a little bit of load on the machine, so I’ll just stop that and rewind it. And wait for a few minutes while the simulation calculates. When the simulation is completed and fully stored on the disk as a cache then the readout up here will say sim idle once again. We can go ahead and play this back in the viewports. Let’s close some of these windows, move the Simulation View out of the way, and press play. I’ve set this up so that we can see playback in all viewports in the time configuration dialog. So that looks pretty good. We can now try rendering this. Back in our Simulation View we have our Render Settings. I want to render this in Arnold, so down here under Liquid Settings, Render As, instead of Cache Mesh I’ll choose Arnold Surface. And this is very important, because doing it this way we don’t have to build an additional mesh cache, we can just render the surface directly. For Surface Type we want Mesh, Render Component should be Voxel. And one last little thing in here, we want to increase the Dilate just a little bit to 0.01. This is just going to expand the volume of the fluid a little bit, so that when we have thin film of liquid on the surface it will still render. And finally, very importantly, we don’t have any foam or bubbles in this shot, so in the Foam Settings we need to set the Render As type to None. Otherwise we’ll get an error message and the shot will not render in Arnold. I’ve got a material prepared for the liquid also. I can close the Simulation View and open the Material Editor. And here it is, I can double-click it to load its parameters. And also assign it to the selected liquid object by clicking Assign Material to Selection. Its an Arnold Standard Surface with no Base Color, so this is going to be a transparent liquid. It’s got Specular Reflections at maximum with a very low Roughness. And then most importantly, it’s got a high Transmission value, .95, almost the maximum. almost the maximum. And I’ve also tinted it with some Transmission color. And I’ve also tinted it with some Transmission color. And by the way, the liquid object is unique. And by the way, the liquid object is unique. It’s already not opaque. It’s already not opaque. All other object types in 3ds Max All other object types in 3ds Max need to have the Arnold properties modifier applied need to have the Arnold properties modifier applied if you want to make them cast transparent shadows. if you want to make them cast transparent shadows. But the liquid object is already not opaque by default. But the liquid object is already not opaque by default. So we can go ahead and do a test render. So we can go ahead and do a test render. I can close the Slate Material Editor I can close the Slate Material Editor and let’s do an ActiveShade render and let’s do an ActiveShade render of the PhysicalCamera view. of the PhysicalCamera view. And there it is in all its glory. And there it is in all its glory. And as we scrub through the timeline And as we scrub through the timeline we can preview the rendering. we can preview the rendering. And if I go down to frame 15 or so And if I go down to frame 15 or so we can see that it’s splashing. we can see that it’s splashing. And there’s actually some motion blur on this by default, And there’s actually some motion blur on this by default, because I’m using a PhysicalCamera. because I’m using a PhysicalCamera. That’s a quick introduction to 3ds Max Fluids. That’s a quick introduction to 3ds Max Fluids.
Закрепляйте полученные в процессе обучения знания с помощью файлов упражнений
Загрузите файлы, используемые преподавателем для ведения курса. Следуйте им и обучайтесь, просматривая, слушая и выполняя упражнения.
- Файл упражнений: подпишитесь для получения доступа. Ex_Files_3DSMax_Q1_2018.zip
- Файл упражнений: подпишитесь для получения доступа. Ex_Files_3DSMax_Q1_2019.zip
- Файл упражнений: подпишитесь для получения доступа. Ex_Files_3DSMax_Q2_2018.zip
- Файл упражнений: подпишитесь для получения доступа. Ex_Files_3DSMax_Q2_2019.zip
- Файл упражнений: подпишитесь для получения доступа. Ex_Files_3DSMax_Q3_2017.zip
- Файл упражнений: подпишитесь для получения доступа. Ex_Files_3DSMax_Q3_2018.zip
- Файл упражнений: подпишитесь для получения доступа. Ex_Files_3DSMax_Q4_2017.zip
- Файл упражнений: подпишитесь для получения доступа. Ex_Files_3DSMax_Q4_2018.zip
- Файл упражнений: подпишитесь для получения доступа. Ex_Files_3DSMax_Q3_2019.zip
- Файл упражнений: подпишитесь для получения доступа. Ex_Files_3DSMax_Q4_2019.zip
- Файл упражнений: подпишитесь для получения доступа. Ex_Files_3DSMax_Q1_2020.zip
- Файл упражнений: подпишитесь для получения доступа. Ex_Files_3DSMax_Q2_2020.zip
- Файл упражнений: подпишитесь для получения доступа. Ex_Files_3DSMax_Q3_2020.zip
- Файл упражнений: подпишитесь для получения доступа. Ex_Files_3DSMax_Q4_2020.zip
Загрузите файлы упражнений для этого курса. Получите бесплатную пробную подписку прямо сейчас.
Загрузите курсы и проходите обучение, где бы вы ни находились
Просматривайте курсы на мобильном устройстве без подключения к Интернету. Загружайте курсы, используя приложение LinkedIn Learning для iOS или Android.
Просматривайте этот курс в любое время и в любом месте. Получите бесплатную пробную подписку прямо сейчас.
Начните обучение сегодня.
Приобретайте наиболее востребованные деловые, технические и творческие навыки под руководством отраслевых экспертов.
Ознакомьтесь с темами, касающимися бизнеса
- Business Analysis and Strategy
- Business Software and Tools
- Career Development
- Customer Service
- Diversity, Equity, and Inclusion (DEI)
- Finance and Accounting
- Human Resources
- Leadership and Management
- Marketing
- Professional Development
- Project Management
- Sales
- Small Business and Entrepreneurship
- Training and Education
Ознакомьтесь с темами, касающимися творчества
- AEC
- Animation and Illustration
- Audio and Music
- Graphic Design
- Motion Graphics and VFX
- Photography
- Product and Manufacturing
- User Experience
- Video
- Visualization and Real-Time
- Web Design
Ознакомьтесь с темами, касающимися технологий
- Artificial Intelligence (AI)
- Cloud Computing
- Data Science
- Database Management
- DevOps
- Hardware
- IT Help Desk
- Mobile Development
- Network and System Administration
- Security
- Software Development
- Web Development
- LinkedIn © 2024 г.
- О компании
- Специальные возможности
- Пользовательское соглашение
- Политика конфиденциальности
- Политика использования файлов cookie
- Политика защиты авторских прав
- Политика торговой марки
- Настройки гостя
- Правила сообщества
- العربية (арабский)
- Čeština (чешский)
- Dansk (датский)
- Deutsch (немецкий)
- English (английский)
- Español (испанский)
- Français (французский)
- हिंदी (хинди)
- Bahasa Indonesia (индонезийский)
- Italiano (итальянский)
- 日本語 (японский)
- 한국어 (корейский)
- Bahasa Malaysia (малайский)
- Nederlands (нидерландский)
- Norsk (норвежский)
- Polski (польский)
- Português (португальский)
- Română (румынский)
- Русский (Russian)
- Svenska (шведский)
- ภาษาไทย (тайский)
- Tagalog (тагальский)
- Türkçe (турецкий)
- Українська (украинский)
- 简体中文 (китайский (упрощенный))
- 正體中文 (китайский (традиционный))
Autodesk 3ds max 2024 Уровень 3 — Анимация и спецэффекты

Потрясающие возможности 3D-анимации в Autodesk 3ds Max 2024 позволят Вам создавать различные видеоматериалы самой широкой направленности – от 3D-мультфильмов и до телерекламы. Заставки, спецэффекты, оформление эфира, анимация для игр и технологических визуализаций – всё это рассматривается на занятиях курса.
Ближайшая группа
Дата начала 16.04.2024 Преподаватель Эпов Дмитрий Андреевич
Формат обучения
Очно , онлайн
10:00 — 17:10
Длительность: 32 ак. ч.
Для физ.лиц
Для организаций*
Очно 49 990 ₽
Онлайн 49 990 ₽
* Для оформления заказа от организации обращайтесь по тел. +7 (495) 780-48-44
Записаться в 1 клик Посмотреть все группы
Преподаватели
Эпов Дмитрий Андреевич
Описание курса
Данный контент доступен только авторизованным пользователям. Пожалуйста, войдите на сайт, либо зарегистрируйтесь.
Обучение проходит на последней версии 3ds Maх 2024!
Autodesk 3ds Max 2024 – передовая платформа для производства 3d-графики, применяемая для решения самых разнообразных задач: от визуализации интерьеров и архитектурных проектов и до создания спецэффектов для кино и контента для телеэфира.
В процессе прохождения курса слушатели выполняют ряд практических работ, результатом которых являются не только ряд видеороликов, но и богатая практика, позволяющая начать формирование своего портфолио и легко применять полученные знания на своих собственных проектах.
Потрясающие возможности 3D-анимации в Autodesk 3ds Max 2024 позволят Вам создавать различные видеоматериалы самой широкой направленности – от 3D-мультфильмов и до телерекламы. Заставки, спецэффекты, оформление эфира, анимация для игр и технологических визуализаций – всё это рассматривается на занятиях курса.
Вы изучите методы анимации трёхмерных объектов, их свойств, материалов и модификаторов. Вы освоите различные методы создания сложной, комплексной анимации трёхмерных сцен, а также создание спецэффектов различного рода. Помимо этого, в программе курса рассматриваются возможности Autodesk 3ds Max, связанные с анимацией ткани, волос и меха. Также даётся обзор актуальных подключаемых модулей (плагинов), предназначенных для создания анимации и спецэффектов.
В процессе учёбы рассматриваются новейшие анимационные возможности 3ds max, такие как улучшенная система управления путём движения объекта Motion Path.
Курс предназначен для архитекторов, дизайнеров интерьеров и художников, работающих в архитектурных фирмах, рекламных агентствах, мебельных салонах, строительных организациях, на телевидении.