Revit to 3d Studio Max
3D Studio max is one of the best software to get photorealistic renders and video-animations to show our projects to the client. So it is a good complement to Revit software.
Objectives
The main object of this guideline is to show the different options of exporting a model from Revit to 3d Studio Max to do photorealistic renders. While there are several options in the workflow, the user will be able to choose which in the most suitable depending on each project.
Prerequisites
- User will be using revit 2015
- User will be using 3d studio max 2015 or 3d studio max Design 2015
- User has knowledge to use either of the software properly
Procedure
1 Prepping Revit Model for 3ds max
- Limit geometry by hiding or deleting → Use Visibility & Graphics to control it.
- Purge unused before exporting → Manage / Purge unused.
- Apply materials to all the elements in the Revit scene and also the elements inside a family. Try to apply specific materials not leaving generic materials without changing them.
- Light properties are accurately transferred to 3d studio max. Therefore, make sure the lights you have in the current scene possesses the properties you want to use in 3d studio max.
- The environmental settings are also transferred to 3d studio max, so assure to have the correct Solar orientation of the project.
- RPC from Revit are not supported in 3ds Max → Remove them from the scene before exporting.
- Section box to control the view or Auto-section Box (add-in).
2 Revit vs. 3ds max Rendering
There are several ways to get renders from Revit´s model: you can render directly in Revit, render in the cloud with Autodesk 360 or use another software application to render the image.
Render from Revit it is not a good option because of the quality of Revit’s render engine and the shortlist of possibilities that it offers. Autodesk cloud is an online render gallery that allows to do Renders really fast and access to multiple versions of the renderings on the cloud, change rendering quality and apply background environments to rendered scenes.
However, we find that the best option to get high quality Renders is through 3d Studio Max and the best option to get fast and nice Renders is through Lumion.
- 16 core for rendering
- Animated Solar Study
- Limited Effects
3ds max Rendering:
- Unlimited cores for rendering
- Camera & Rendering effects
- Enhanced quality / Lighting control
- Vray
- Batch rendering, to kick off a sequence of images
- Distributed rendering
3 Export Options from Revit
We have three options for the exportation:
- DWG / DWF for Geometry Information (cannot export materials or lighting information, etc.)
- Suite Workflows — FBX, which keeps geometry information, material data, lights and environmental settings and link the model directly to 3d studio Max.
- FBX export which keeps geometry information, material data, lights and environmental settings.
FBX export, is the preferred format due to it keeps metadata and geometry information and the option to link the model from Revit instead of importing it may be a good option if we are still doing changes in the project.
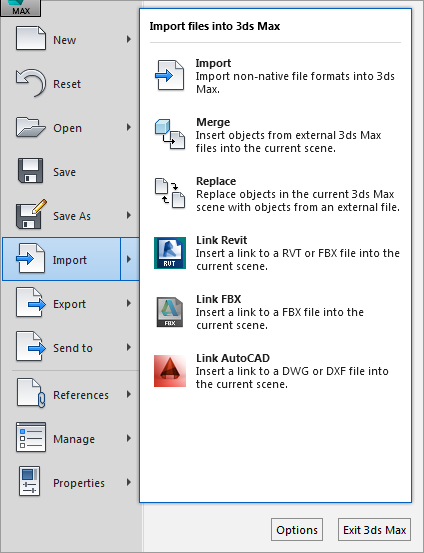
4 Importing FBX file in 3ds Max
There are two options of importing a Fbx file in 3d studio max:
We can go back to Revit, update the design, re-export the Fbx model and replace the file updating in 3d studio max.
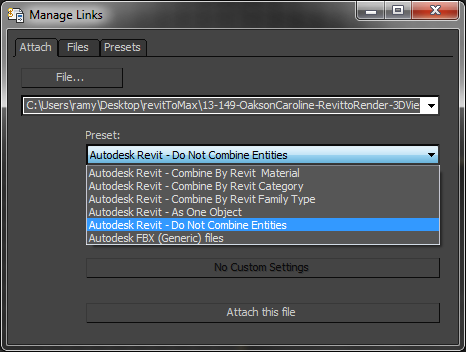
Settings of importation depending on how we have modelled the project and applied the materials:
Choose Preset (how to combine objects):
- Combine by Revit Material
- Combine by Revit Category
- Combine by Revit Family Type
- As one Object
- Do not Combine Entities
5 3d studio Max
Materials:
T he implementation in Revit now includes the Autodesk materials, a derivation of the Arch & Design material from Autodesk 3ds Max, arguably one of the most powerful and productive materials for mental ray in that application. The advantage of this is that you can transfer materials from Revit straight into Autodesk 3ds Max without losing any of the quality or appearance. Revit also has many of the same controls as Autodesk 3ds Max for rendering with mental ray. But this is where the similarity ends and the issues begin .
- Create new materials
- Modify Revit materials (scale textures, change diffuse and standard color, etc.)
- Re-texture
Animation:
Autodesk can render a walkthrough, however you have little control over the animation. Transferring the model to 3d studio max is almost mandatory. Autodesk 3d studio max is also meant as an animation platform giving far greater control over the camera, the lighting, materials and even the ability to animate objects within your scene such as opening doors that you walk through. It also allows you to create and render multiple cameras that can then be stitched together into a single file, a small movie of the project.
- Create simple animation
Render Scene:
- Choose the best Renderer Engine
- Customize the size of the Render
- Precision Presets
Bottom-line
- To prepare the Revit model before exporting
- The ways of exporting a Revit model to 3d studio max
- The way of importing a fbx model into 3d studio max
- The characteristics of the imported model
Linking Revit Models to 3DS Max for Rendering
This will import the Revit file as a link to the original Revit file. This is a one way link, where, any modifications done to the Revit file will be seen in the 3DS Max file, but, not in the opposite direction. So, no modifications done to the model in 3DS will be seen in the model while in Revit. All lights, materials, cameras, geometry in that Revit view will be linked to 3DS Max using this process.
Items to check while using this process:
- Verify any material brought in from Revit look the way you want them to look in 3DS Max.
- Analyze the geometry of the Revit model in 3DS Max to be sure there are no odd conditions such as: (to name a few)
- Walls are not joining at the corners.
- Floor plans are not protruding through the walls.
- Ceiling materials are on the ceiling and not on the vertical part of the soffit, on the floor, or anywhere else that just doesn’t make sense.
Revit to 3ds max
Revit among architects is much more common these days, and it makes everyone’s job easier including 3D artists. However getting that revit model into 3dsmax is not always the most straight forward process, and finding the right workflow from Revit to 3dsmax can feel like searching for the Holy Grail. I’ve become quite familiar with this process and decided to post my experience with the various ways to get a .rvt file into a beautiful .max format.
DWG
When exporting to dwg from revit, it’s really straight forward. There are 2 flavors of dwg to export from Revit (Solids vs Polymesh), but they have been moved from the standard dwg export, to revits dwg export options under the Solids tab. For the most part, you can leave it at the default settings. Now, the advantage of dwg is that geometry comes in clean, poly counts are low and curves come in not too tessellated. Also, families from revit will come in as instanced geometry, which is really nice and keeps the file size down. One disadvantage is that that any links from the revit file get dropped. So if there are any mechanical, structural, or other revit linked files, they don’t get picked up upon export. So if you’re coordinating with an architect, it can be a pain on their end to open each of the linked files and export them out separately.
FBX
This for a while now has been the silver bullet when it comes to file interoperability, and Autodesk has worked really hard to get this one fool proof. For the most part, it is. The nice thing about fbx, is that any revit links will get picked up with the base .rvt file. It will also be mental ray ready, meaning if time was spent in revit to add materials and lights, they will come in with the model. There are 2 big disadvantages to fbx however. The tessellation on curved objects such as railings are incredibly bloated and very heavy in poly counts.
RVT
Since 3dsmax 2015 (I think) it’s actually possible to import or link a revit file straight into 3dsmax. This seems like the most obvious option, and actually is not a bad one. The advantages are that you don’t need revit to get your .rvt file into 3dsmax. Other than that, it has the same tessellation issues as fbx. Unfortunately just like dwg, it doesn’t have the other linked revit files that the architect may have. So in this instance, fbx is always better than rvt…for now.
Link or Import?
On the max side there are several ways to get your geometry into your scene that can give you different results. I will say linking almost always gives you more control on how to handle the geometry. To link in 3dsmax go to the top left jewel icon->Import->Link Revit/FBX/CAD.
There are several ways to link the geometry. Much of it depends on how the revit file was handled. For example if you know it’s textured correctly, then choosing “Combine by Revit Material” would be a good option. However if you chose that option, and there were no materials on the revit file, then the geometry will come in as 1 humongous mesh, and a pain to work with. Typically I choose “Do Not Combine Entities”, as this imports every revit family as a separate object just as it is in Revit.
When you link an .fbx file, a folder in the same location as the fbx is created and 3dsmax dumps all of the embedded texture maps relating to the Autodesk materials to that folder. I typically delete this folder, as I use my own material library. When you import a .rvt file, it will ask you which camera do you want to link. Currently 3dsmax will only let you choose 1 camera to link. This can be problematic if the architect has dozens of cameras in their revit file. After linking is complete, then I go back to the link manager and bind what I have in my scene so it will convert everything to editable meshes.
The Verdict
After going through all these, my favorite is dwg from revit. Mostly because curved objects are not overly tessellated and multiple objects come in as instances. This is only when I know that the revit file does not have any other revit links. Now if there are revit links, or I’m not too sure, my fool-proof method is fbx. The downside of course is with a large and bloated file. Also note that in the fbx format revit families are still instances. As soon as they come into 3dsmax world, every mullion, furniture, toilet stall is a copy, which makes files huge. To combat this I have a maxscript that finds identical geometry and converts them from copies to instances. You can download it here. With this script, I successfully got a 1.4GB max file down to 150MB. If anyone has other experiences or solutions feel free to share.
whoa there, pardner!
Your request has been blocked due to a network policy.
Try logging in or creating an account here to get back to browsing.
If you’re running a script or application, please register or sign in with your developer credentials here. Additionally make sure your User-Agent is not empty and is something unique and descriptive and try again. if you’re supplying an alternate User-Agent string, try changing back to default as that can sometimes result in a block.
You can read Reddit’s Terms of Service here.
if you think that we’ve incorrectly blocked you or you would like to discuss easier ways to get the data you want, please file a ticket here.
when contacting us, please include your ip address which is: 95.214.216.211 and reddit account