An Overview of Arnold in Cinema 4D
While there are a lot of rendering options out there in Cinema 4D there are four main third-party render engines you need to know Arnold, Octane, Redshift and Cycles. We thought it’d be fun to take an in-depth look at all four of these amazing tools and discuss why you might prefer one over the other for rendering in Cinema 4D.
In this article we will introduce you to Solid Angle’s Arnold Render Engine. This post should be a good overview if you’ve never heard of Arnold or if you’re curious about using it in Cinema 4D.
Some of the terms used in this article series may be a bit geeky to say the least. If you find yourself wondering what any of the terms mean, check out our 3D Glossary.
What is Arnold Render?
As written on Solid Angle’s site, “Arnold is an advanced Monte Carlo ray tracing renderer built for the demands of feature-length animation and visual effects.”
Broken down, Arnold is an unbiased CPU render engine that uses a technique, Monte Carlo, for rendering. We told you this would get geeky.
That means Arnold prides itself on obtaining photorealistic renders far above what you can get out of the standard and physical renders in Cinema4D. That leads nicely into why you may consider using Arnold in the future.
Why should I use Arnold Render?
The job of these first few articles isn’t a compare and contrast. We’ll follow up with one of those shortly. This is just the facts so you can make an informed decision in your career.
#1: SOLID IS IN SOLID ANGLE’S NAME FOR A REASON
Arnold is extremely solid. You can throw gigantic scene files at it and with a great degree of certitude knowing you won’t have to worry about Arnold crashing and being unable to handle the scene. Why else would it be used so heavily in VFX and movies?

#2: ARNOLD LOOKS BEAUTIFUL
Arnold has a quality about it that can make images look as close as you can get to photorealistic. Part of that is because Arnold is an unbiased render engine. That means it tries to mimic the real world as closely as possible without taking short cuts. It also has to do with the algorithms it uses behind the scenes to calculate its images.

#3: INCREASE YOUR WORKFLOW SPEED WITH THE IPR (INTERACTIVE PREVIEW REGION)
This isn’t something only Arnold can do, however it is a big perk of using any 3rd party render software. An interactive preview region is a window that shows you what your rendered scene looks like in almost real time. No more hitting Ctrl/Cmd-R and waiting 10 minutes to see if your scene looks okay with that new lighting setup. When you update your scene, the IPR updates almost instantly, increasing your workflow exponentially.

#4: USE ARNOLD ANYWHERE
Arnold is just about everywhere. If Cinema4D isn’t the only 3D application you are using, it is likely Solid Angle has put out a plugin for whatever else you’re using. Currently, Arnold has plugins for Cinema4D, Maya, 3DSMax, Houdini, Katana, and Softimage. Solid Angle doesn’t charge you to use additional plugins either. You can easily hop between 3D applications without needing to spend any more money.
#5: ARNOLD’S WORKFLOW TRANSLATES WELLS TO OTHER ENGINES
Learning Arnold is a great way to build a foundation that carries over to other render engines. Arnold’s shader and material system uses common terminology, and a node based workflow, that can be found in other render engines. If you are on a team that uses Arnold, and move to another shop that uses Redshift, you’re going to notice a lot of similarities. It is kind of like learning to drive in a Toyota, and then driving a Ford. There are differences, but it is all basically the same, too.
#6: ARNOLD IS CPU BASED
PAUSE: Now before you run off and shoot us emails about how CPU is so slow and everything is going GPU. cats and dogs living together, I am Zuul…take a breath and read this.Arnold being a CPU third party render engine means that it works on both PC and Mac. You can download it right now on whatever workstation you’re using. If you’re a hardcore Mac user, this is a really big deal. I read so many threads about Mac users switching to PC so they can upgrade to using GPU based render engines. You don’t necessarily have to upgrade your hardware to take advantage of Arnold. How ‘bout dem apples? Being CPU also means it has one big advantage over GPU.

#7: THERE IS A TON OF RENDER FARM SUPPORT
Since Arnold has been around since the late ‘90s, it has a large following. That means you can very easily find a render farm that supports Arnold. If you’ve got a really big job and your scene is taking 15-minutes a frame to churn out, send it out to a place like PixelPlow and get it back the same day.While there are a couple render farms that support GPU render engines, it isn’t like CPU and Arnold support.

Reasons Not to Use Arnold?
As with any third party render engine, it is something else to buy. Cinema 4D and other 3D applications cost quite a bit of money. Adding something else on top of that isn’t always something feasible or desirable. Especially as a freelancer.
It is one more thing to learn. It isn’t a one-to-one correlation to the standard and physical materials in C4D. If you’re a beginner or still not accustomed to what Cinema 4D is able to do out of the box, you probably aren’t ready to move on to a third-party engine.
Lastly, at the time of writing, Arnold is a CPU engine when everything is moving towards using GPUs. While we did say this is a perk, it is also a hindrance. It isn’t going to be as fast rendering locally and you will need to take advantage of render farms. It really is a catch-22 situation at the moment, so be sure to check back in the future as the world of rendering evolves.
How Can I Learn More About Arnold?
Solid Angle’s website is a great resource and sites like Helloluxx and Greyscale Gorilla offer training and tutorials solutions.
WHAT ARE YOU USING?
What render engines are you using or interested in? Got something cool that you’ve rendered? Let us know on Twitter @schoolofmotion! And of course if you want to take your Cinema 4D skills to the next level check out Cinema 4D Ascent from EJ Hassenfratz here on School of Motion.
Dive into real-time 3D with our Unreal Engine beginner’s course by Jonathan Winbush. Master importing assets, world-building, animation, and cinematic sequences to create stunning 3D renders in no time! Perfect for motion designers ready to level up.

Unlock the secrets of character design in this dynamic course! Explore shape language, anatomy rules, and motifs to craft animation-ready characters. Gain drawing tips, hacks, and Procreate mastery (or any drawing app). Ideal for artists seeking to elevate their craft.

Elevate your freelance motion design career with our guide to client success. Master a repeatable method for finding, contacting, and landing clients. Learn to identify prospects, nurture leads, and develop a thriving freelance philosophy amidst chaos.
Rev up your editing skills with After Effects! Learn to use it for everyday needs and craft dynamic templates (Mogrts) for smarter teamwork. You’ll master creating animated graphics, removing unwanted elements, tracking graphics, and making customizable templates.

Stand out with Demo Reel Dash! Learn to spotlight your best work and market your unique brand of magic. By the end, you’ll have a brand new demo reel and a custom campaign to showcase yourself to an audience aligned with your career goals.
Illuminate your 3D skills with Lights, Camera, Render! Dive deep into advanced Cinema 4D techniques with David Ariew. Master core cinematography skills, gain valuable assets, and learn tools and best practices to create stunning work that wows clients.
Master After Effects at your own pace with Jake Bartlett’s beginner course. Perfect for video editors, you’ll learn to create stylish animated graphics, remove unwanted elements, and track graphics into shots. By the end, you’ll be equipped for everyday AE needs and more.
Revolutionize your Premiere workflow with customizable AE templates! Master creating dynamic Motion Graphics Templates (Mogrts) in After Effects to speed up your team’s work. By the end, you’ll craft easily-customizable templates for seamless use in Premiere Pro.

Your download is in your inbox.
Check your email (spam, too) for the download link!
Please check the spam folder if you don’t see the message within a minute or two. Google likes to hide your downloads, sometimes.
Oops! Something went wrong while submitting the form.

Not sure where to start?
If you’re a beginner, here are some great courses to help you get started:
After Effects Kickstart
Dive into the fundamentals of motion design with our most popular (and recently updated) After Effects course.
Photoshop + Illustrator Unleashed
Master the basics of Photoshop and Illustrator and gain invaluable insights in this introductory level course.

Design Kickstart
An introduction to the design principles behind all great work.
More Advanced?
If you’re a more advanced student looking to up your game, here are some great options:

Animation Bootcamp
Learn the art and principles of creating beautiful movements in Adobe After Effects.

Design Bootcamp
Learn to design for motion in this intermediate-level, project-based course.
Cinema 4D Basecamp
Learn Cinema 4D from the ground up in this exciting introductory C4D course.
Now is the time to learn the skills you need to advance in your motion design career:
Rendering with Arnold

Arnold is an advanced cross-platform rendering solution, developed by Solid Angle and used by renowned customers in film, television and animation. It was developed as a photo-realistic, physically-based ray tracing alternative to traditional scanline based rendering software for CG animation.
Arnold uses cutting-edge algorithms that make the most effective use of your computer’s hardware resources and was designed to easily adapt to existing pipelines. It is built on top of a pluggable node system, so users can extend and customize the system by writing new shaders, cameras, filters and output driver nodes, as well as procedural geometry, custom ray types and user-defined geometric data. The primary goal of the Arnold architecture is to provide a complete solution as a primary renderer for animation and visual effects.
How to submit a job using Cinema 4D and Arnold Renderer
Open your scene in Cinema 4D with Arnold Renderer and open the render setup.
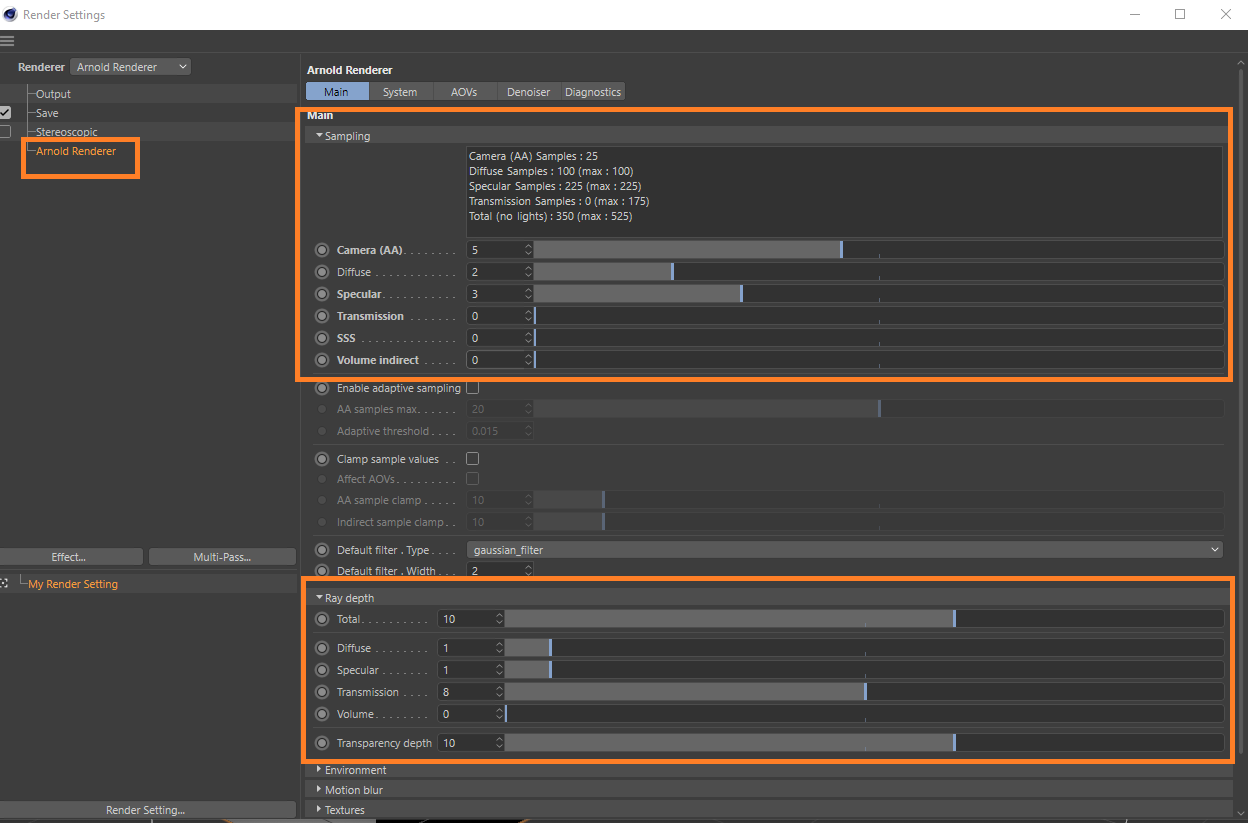
Please navigate to the Arnold render settings.
Go to the ‘Main’ tab in the Arnold render settings, where you are able to set the sampling quality. Increasing the sampling rates reduces the amount of noise in the images. Please note that these values affect the render time in the render cloud, so make a few local tests before sending the job to the render cloud.
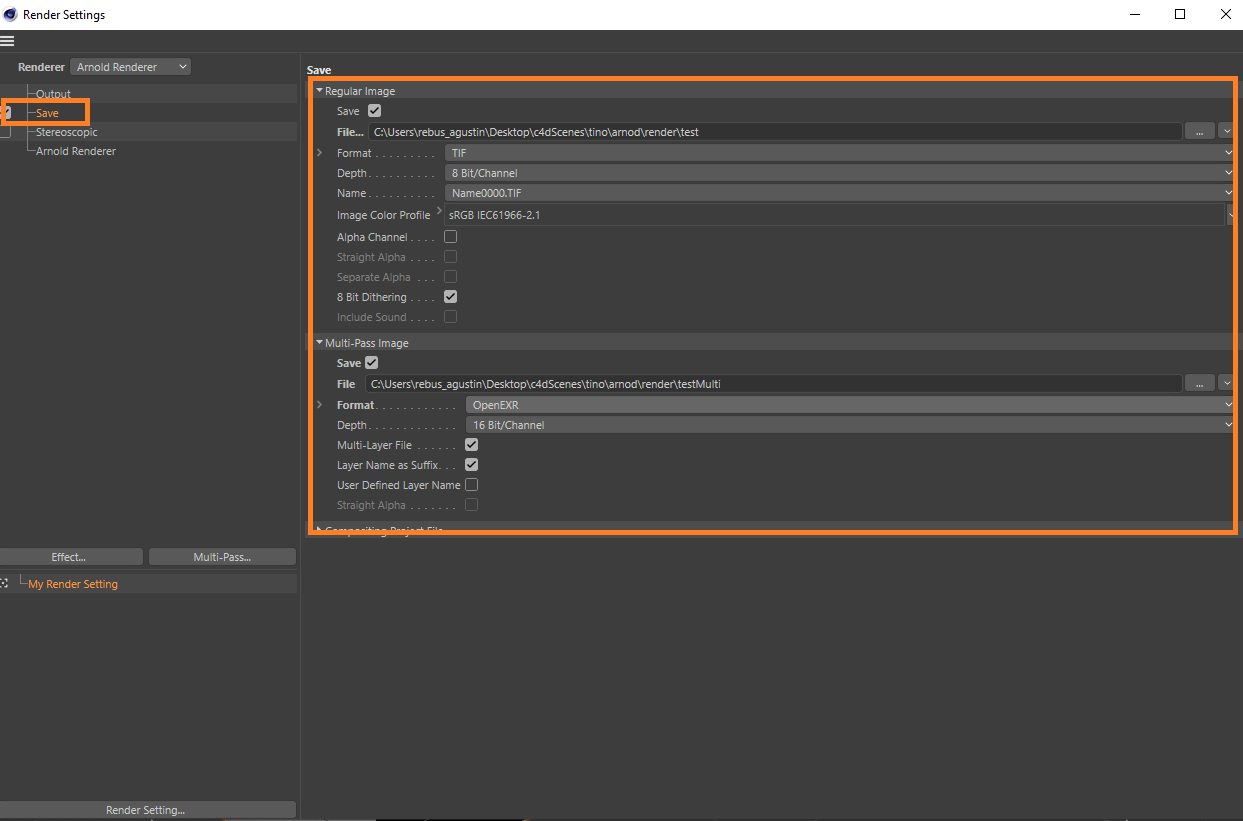
Now please navigate to the Cinema 4D render settings ‘Save’ tab and set a save path for the regular image that you want to render online.
Click on the ‘. ‘ button and define a name and a save path for the regular image.
Navigate to the Cinema 4D render settings ‘Output’ tab to set the resolution and frame range.
Select the resolution for your results and select the frame range that you want to be rendered in the render cloud.
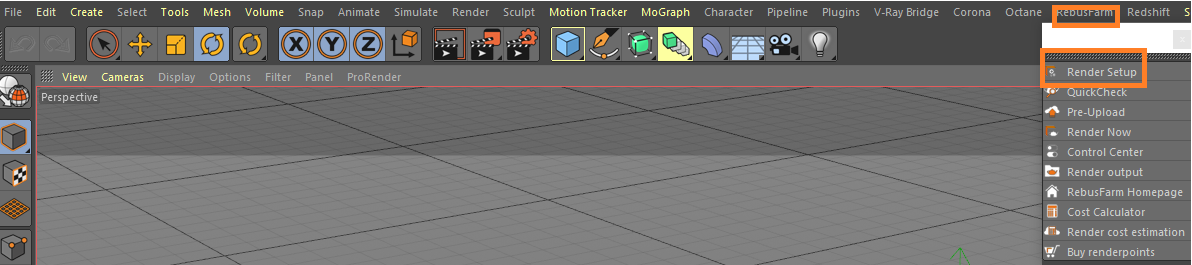
Please close the Cinema 4D render setup and open the RebusFarm setup window to render online. You can do that via the RebusFarm tab or by pressing Ctrl+shift+F on your keyboard.
Please refer to ‘Cinema 4D Job Submission’ for more detailed information about each of the options of the RebusFarm setup window.
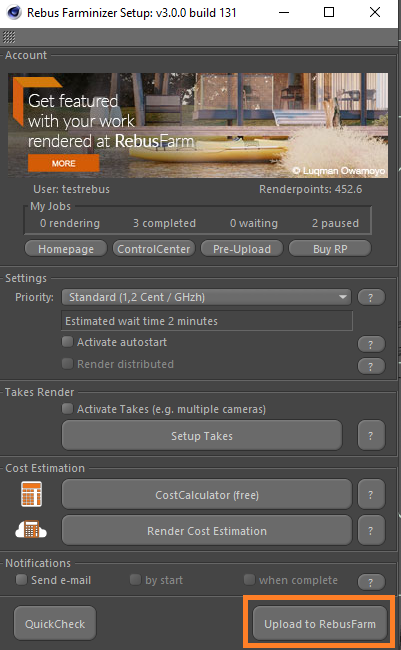
After configuring your RebusFarm settings, please click on the button ‘Upload to RebusFarm’ at the bottom of the RebusFarm setup window.
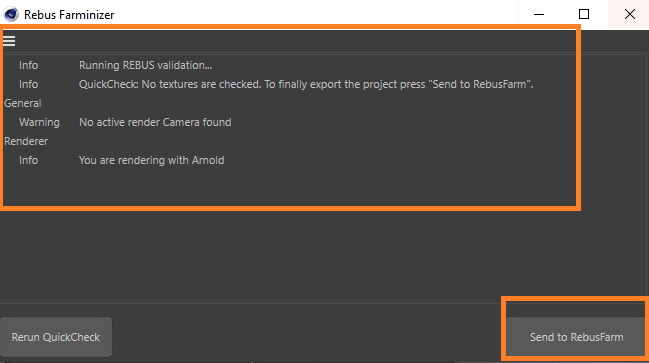
A new window will open for RebusFarm messages, showing all the relevant information, warnings, and errors your scene may have.
If you don’t get an error message, please proceed by clicking on ‘Send to RebusFarm’.
The Rebus Farminizer will upload your render job including all the assets required for rendering. You can check the progress of the upload and rendering by visiting the ControlCenter. Once the upload process is completed, the rendering process will start automatically if you activated the ‘Autostart render’ option before uploading. If not, you will have to start the rendering manually by clicking on the ‘Start render’ button in the ControlCenter. Check our ‘How to use the ControlCenter’ section for more details about the ControlCenter.
Once the render job is completed, your results will automatically be downloaded from the render cloud to the output save path that you set in your render configuration.
- 1. How to sign up?
- 2. How to buy RenderPoints?
- 3. CostCalculator & Cost Estimation
- 4. How to submit a job to the farm?
- 4.1 3ds Max job submission
- 4.2 Blender job submission
- 4.3 Cinema 4D job submission
- Cinema 4D + V-Ray
- Cinema 4D + Standard Renderer
- Cinema 4D + Physical Renderer
- Cinema 4D + Octane
- Cinema 4D + Corona
- Cinema 4D + Redshift
- Cinema 4D + Arnold
arnold render farm
for Cinema 4d
Arnold renderer is an unbiased 3D render engine, beautifully integrated into Cinema 4D. It’s a world class renderer that has all the advanced features you need to make fully featured films. On the farm we support both the classic CPU render mode and also the new GPU accelerated method.
START RENDERING NOW


Our Arnold Features
- All versions of Arnold are supported
- Direct output to your workstation
- Custom check from our C4D plugin for Arnold
- Render passes support
- CPU and GPU support
- One click submission
- Take Rendering support
- Tile Rendering (still images with multiple machines)
Supported software for Arnold
We support all versions of Arnold. Our C4D plugin will detect your version and will use that version on the farm. We also support experimental builds, this means that you can use an old release or the latest build. We update all our plugins weekly to make sure that your version is listed.
Besides Arnold, we support all your favorite third party plugins.

Our C4D Plugin
On our farm, you never need to leave Cinema 4D to submit your render jobs:
We’ve developed a powerful plugin that checks your project and allows you to submit it with just a single click.
When examining your project, we scan for over 300 settings and alert you to any potential issues. Simultaneously, we verify your Arnold version to ensure we utilize the same version on our farm.
There’s no need to gather your assets manually; our system handles that for you. We locate all the necessary assets for your job and remap them using a special script on our end. These files will also be synchronized for 7 days, meaning you won’t have to upload your assets repeatedly. Our aim is to make the rendering process as straightforward as starting a job locally. You can monitor your job through our web interface or even our mobile apps.
Should you have any inquiries about our service, please don’t hesitate to reach out. Even though much is automated, we’re always there to assist you.
Start rendering
Take a look at the demo video below to learn within two minutes how to get started with our service.
It’s very easy! We promise you